
 Recently a new entry appeared in the 3D print slicing market.
Sponsored by printer upgrade and accessories maker E3D, Pathio aims to provide an updated take on 3D print slicing.
The Pathio approach is exciting! However, I have some questions.
- Can they really deliver on their promises of creating a new core slicing engine that ‘does things right’?
- Does Pathio really solve real user problems?
- Is Pathio straightforward, but powerful and flexible?
- Will they follow through on their commitment to actively listening to the community?
Most importantly:
Why should we consider switching from our current slicer to Pathio? Specifically, can Pathio perform better than Cura?
E3D’s Pathio team is making some bold promises, and if they can follow through Pathio could really disrupt the industry and make your life better in the process.
So, what do I think of the state of Pathio, and the road ahead? Let’s find out by comparing Pathio vs Cura.
Technical note: As of this writing Pathio is currently in beta (v0.5.0-beta4), so many of the features are not yet finished. For this article I’m comparing this beta version, with my Ultimaker Cura version 3.6.0. For the full background on Pathio, I recommend visiting their website: https://pathio.xyz/hello-world/.
What I’m Giving You For This Slicer Comparison
In order to give you full transparency in this comparison, I’ll walk you through Pathio’s setup process. I’ll give you some of my insights along the way as well. I’ve already written a tutorial on Cura’s setup you can take a look at for a bit more comparison.
After going through the setup we’ll do some test prints with a direct comparison between Pathio and Cura.
Finally, I’ll be wrapping things up nicely for you with my thoughts on Pathio vs Cura, and the road ahead.
Setting Up Pathio
After installing Pathio, it asks you to log in or create an account. In the future, this will most likely be how they manage licensing, but for now, it just tracks who has installed it and where.
Once past the login, Pathio opens to a splash screen with a couple of quick tips. Once closed you’ll come to this initial setup screen.
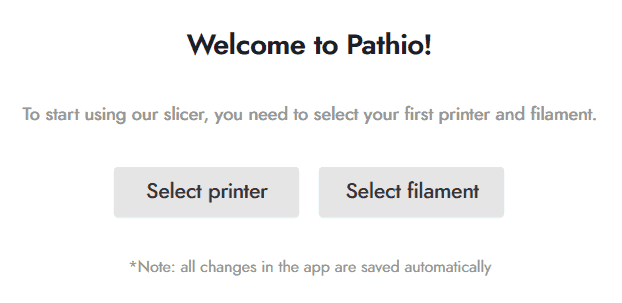
Not surprisingly, Pathio needs you to set up a printer and filament before it can really do anything. The list of available printers is pretty short, but I can’t give them too hard a time. It is a beta after all. The developers have stated they are building their library, and Pathio does support practically any printer that uses normal Gcode.
If you type the name of a printer in the search box, it will filter the list on the fly. Typing a name that doesn’t appear in the list leaves just the Generic/Custom options available. It’s nice to be guided right to the option I most likely need. It could just filter out the entire list and not help you at all!
This is the first of many little details proving user experience is well planned.
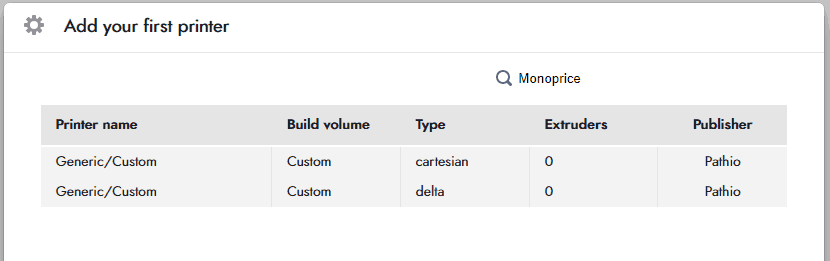
Just like in my Cura settings tutorial, there’s no love for my Maker Select Plus. That’s ok.
That’s actually one of the great things about 3D printing these days. Because there are so many different printers available, it’s impossible for software developers to support them all at once. This means there should always be a way to define your own, leaving the door open for customizing options as you see fit and allowing the software to work with printers that don’t even exist yet.
Generic/Custom it is!
After selecting a printer, Pathio will jump back to the previous window and ask you to select your filament. I’ll admit it was a little surprising to have the printer window close without asking me anything else since it still doesn’t know anything about my printer.
I’m sure it will need further defining, but I’ll move on for now.
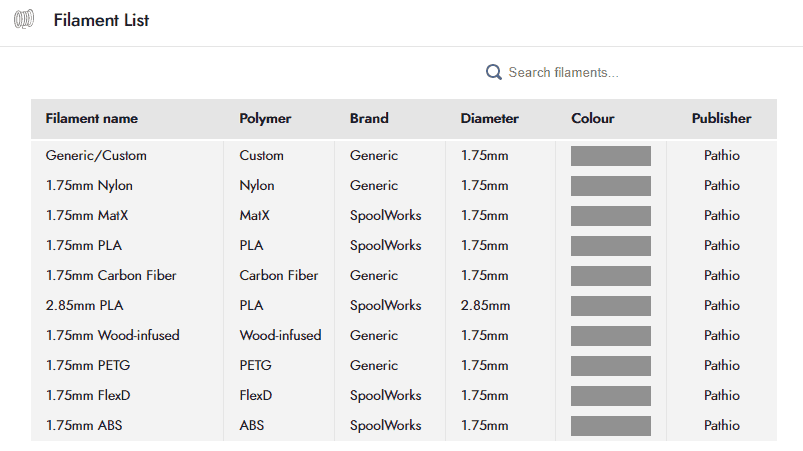
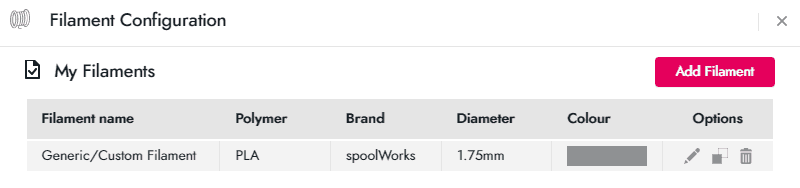
Pathio has generic profiles for four filament types, with the option to define a custom one. It also includes profiles for filaments made by SpoolWorks, the house brand of its sponsor, E3D.
Since it doesn’t have a profile for generic PLA (just SpoolWorks), I’ll go with the Generic/Custom option here too.
After selecting a filament, Pathio says I’m ready to go!
I kind of doubt that, since at this point I’ve told it nothing about my printer or material, but we’ll see.
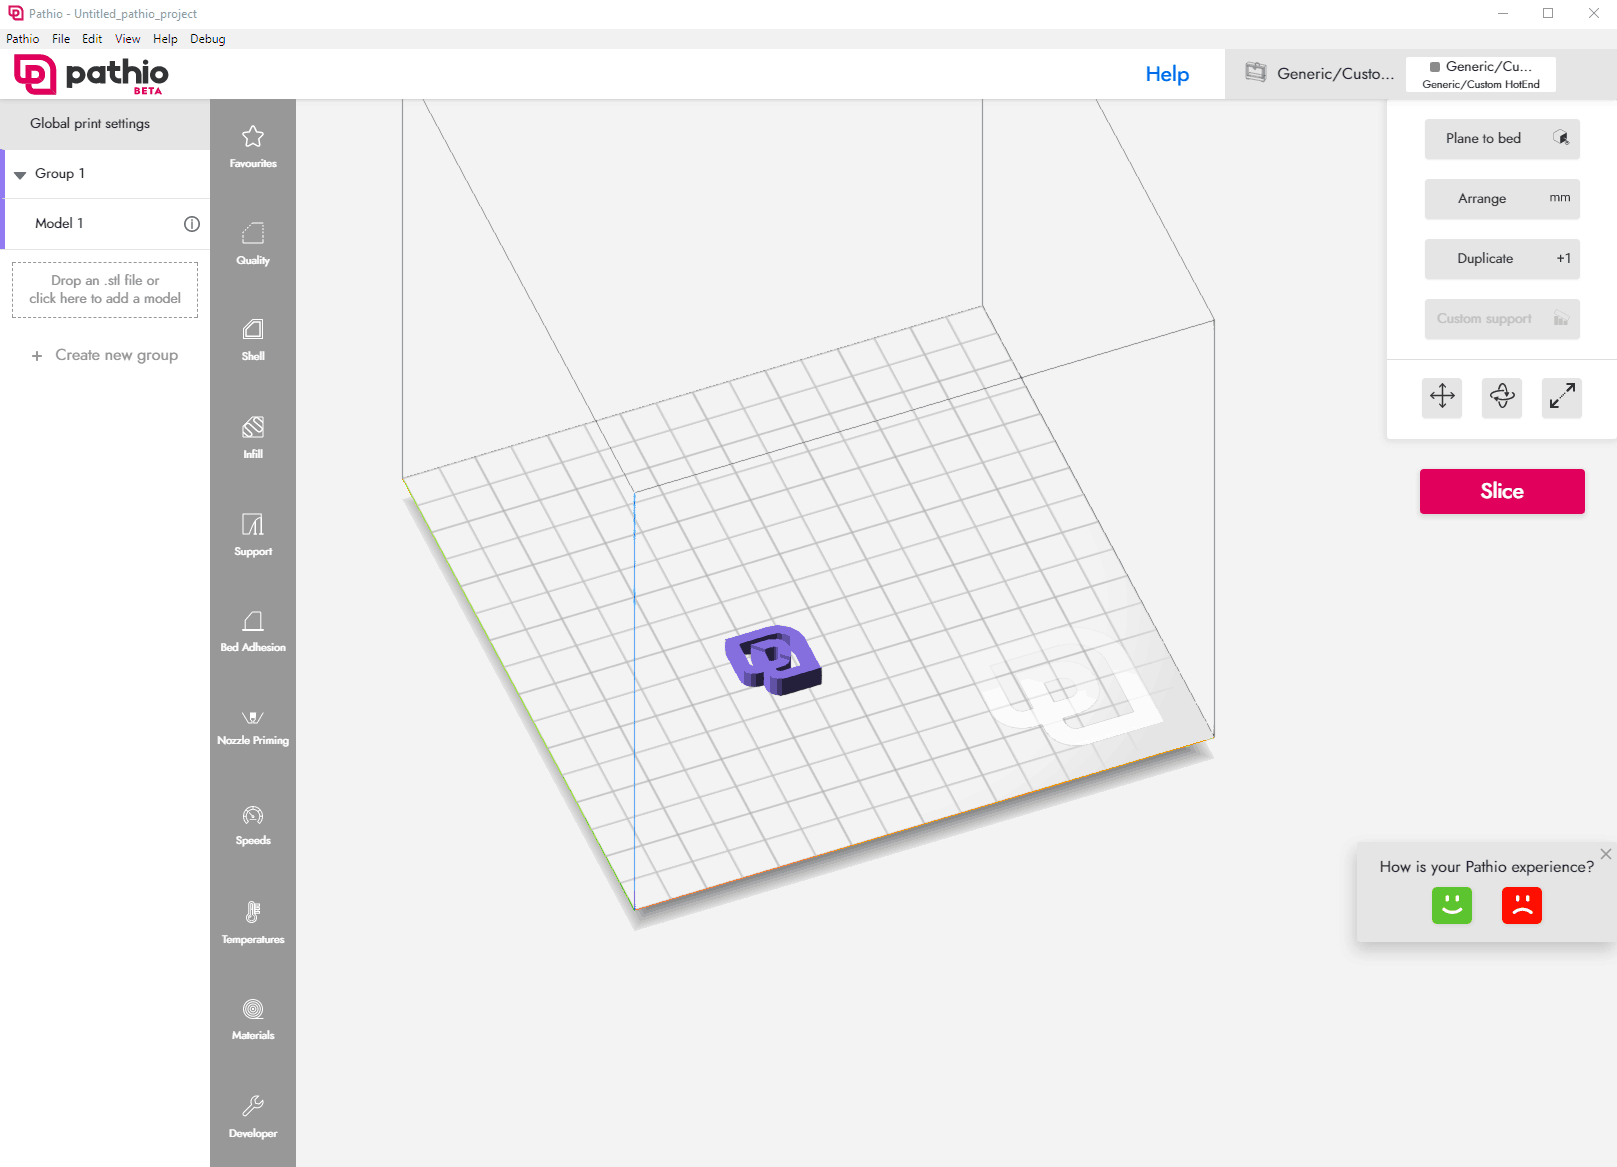
I hit the start slicing button, and am immediately greeted by a virtual build plate with a purple Pathio model on it. Maybe this model was designed to showcase Pathio’s slicing capabilities?
Navigating Pathio
The controls for navigating Pathio’s virtual build plate are similar to Cura’s defaults, but that’s where the similarities stop.
Pathio is clearly doing their own thing here.
The left side of the window holds a group list, with one group and one model defined. The model listed is the Pathio symbol on the virtual build plate. Selecting the model, either on the list or on the plate, highlights it and allows it to be moved or rotated.
Clicking through the options next to the group/model list shows many of the settings you would normally have to select, but some are greyed out and Pathio says they’re unavailable when you mouse over them.
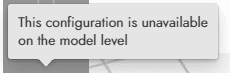
Selecting the group in the list enables all options except Temperatures.
Temperature settings are only modifiable if you select Global print settings right above where it says Group 1. So, in the settings hierarchy, global is the highest, and model is the lowest.
Available settings that are changed at a lower level should override the higher level ones. For instance, changing a setting at the model level should override the global setting.
According to its website, the ability to use different settings per group is one of Pathio’s major selling points. You can fill your build plate with different models even if they require some different options to print correctly. All you have to do is add them to different groups and apply the necessary settings to each one.
I can see this being a very useful feature for maximizing efficiency. Rather than waiting for your print to end to add another print you can set it and forget it.
For now the only settings I’ll change are the nozzle and build plate temperatures. They’ll need to match what I’m using in Cura to make a reasonable comparison between the two.
Many of the options in the settings tabs are the same as what you might find in another slicer, but not all. For instance, I haven’t yet found a way to define an initial (first layer) nozzle temperature versus regular nozzle temperature.
Maybe that hasn’t been included yet.
Before I move on, out of curiosity I tried clicking the pink Slice button on the right side of the screen. Amazingly it actually slices the model without popping up an error, but I have no idea what settings it used for my printer and filament.
I really need to find those options.
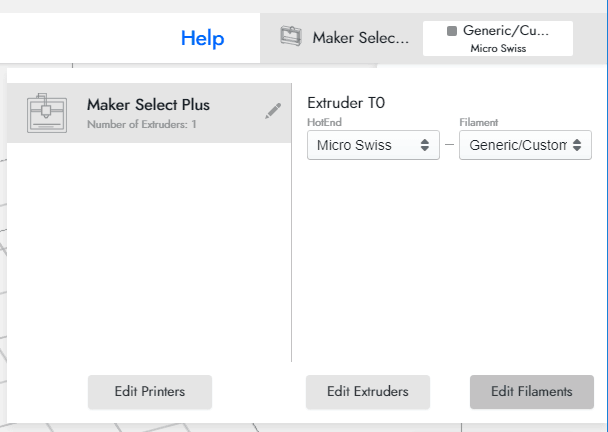
Defining a Printer in Pathio
Clicking on Generic/Custom Printer near the upper right corner of the window opens a drop-down list of printers. I only have the one printer listed, and next to it, one extruder and one filament. Everything is Generic/Custom.
That probably won’t get great results.
Clicking on Edit Printers brings up a list with my one generic printer in it:
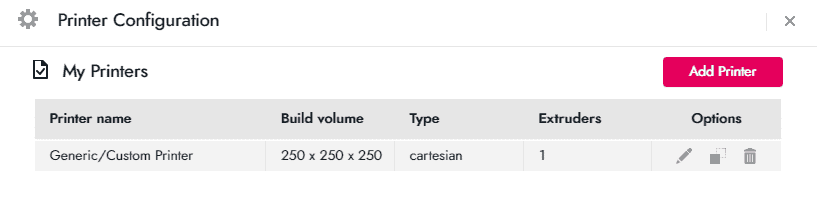
Pathio apparently uses a default build volume of 250x250x250, which is wider, but much shorter than my Maker Select Plus. I might have gotten away with this if I were only printing small objects, but it wouldn’t take long before I was unable to do taller models, or crashed the print head into the gantry.
No problem, this should be easy to change.
This options menu is using the icon-as-button style you see in a lot of newer applications. On the right side, it has a pencil (edit), boxes (copy), and a trash can (delete).
These are fairly intuitive, but would probably benefit from some tooltip text (those little boxes that pop up telling you what a button does). Hint hint dev team!
Clicking on the edit button for my printer opens a window that lets you change all the usual settings on the first tab: Geometry.
There we go. That’s better.
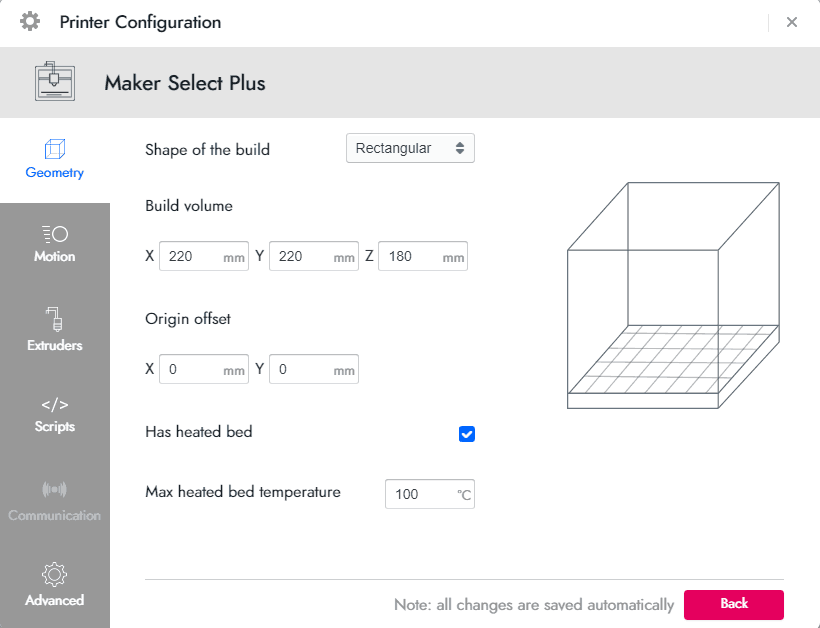
Looking around online, there is conflicting information available on the maximum safe bed temperature for the Maker Select Plus, but I doubt I would have a reason to go above 100 degrees Celsius, so that’s what I’ll use.
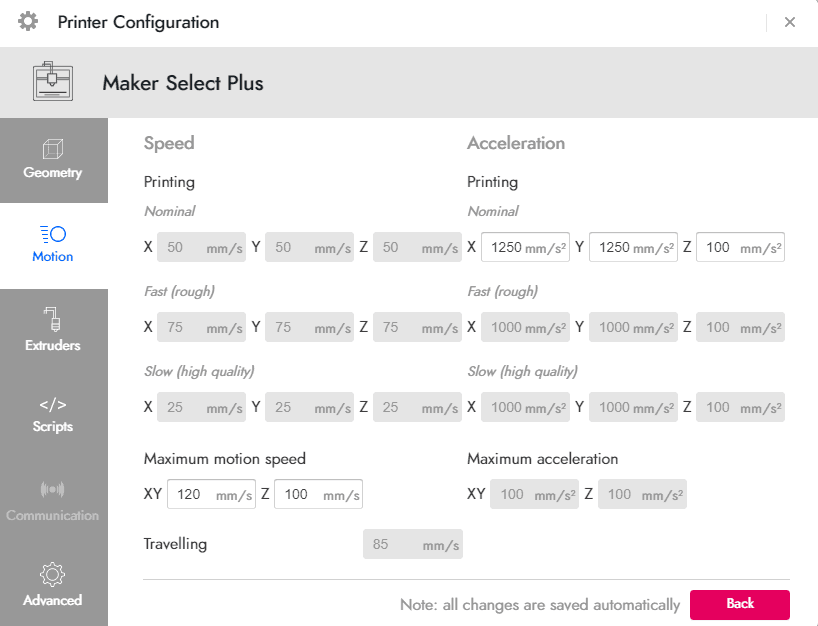
The Motion tab allows you to set printing and movement speeds. Many of these fields aren’t modifiable.
Maybe this is a beta limitation?
I don’t have most of this information readily available anyways, but I do know I can get away with XY movement speeds of 120 mm/s in Cura, so I’ll do the same here. I’ll leave the rest of the editable options on the defaults for now.
The Extruders tab shows the one extruder defined for my printer and one hot end.
At first, I didn’t think there was anything I could edit here, which seemed odd since you definitely need to tell a slicer about your hot end.
To get it to allow me to edit the hot end, I had to click Add HotEnd, delete the generic hot end, then click Add HotEnd again. Only then did the hot end options show up.
This can’t be what the designers intended. It looks like the problem is that the extruder tab has no button that simply allows you to edit an existing hot end. This is probably a bug in the beta.
Once past that issue, the expected settings are available:

The hot end needs a name here, so I added that based on what my printer is currently using. The rest are defaults, but match my printer correctly, so I didn’t change them. Some options are greyed out and can’t be modified.
They’re fine for my printer, but it’s a little odd I can’t change them. Maybe these are dealt with somewhere else?
The Scripts tab has the area for a dozen different snippets of g-code depending on what the printer is doing. A couple of these, such as the starting and ending scripts, are basically identical to Cura’s start G-Code and End G-Code fields in the machine settings window.
Cura’s print start g-code:
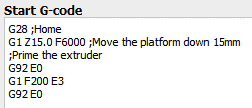
Pathio’s print start g-code:
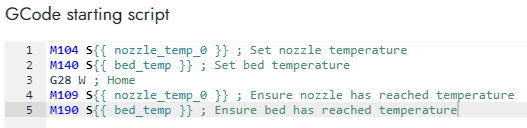
These two examples do some of the same things, though Pathio uses a different philosophy.
- In Cura, it’s just housekeeping tasks that are in the print start g-code settings. Things like temperature setpoints are added to the final g-code when the model is sliced.
- In Pathio all of the commands required for a given action are in that script area, with settings such as nozzle temperature exposed as variables in the script. This is true for every section. For example, if you have retraction enabled, that script area will be populated with the relevant commands.
Pathio’s approach is a powerful concept. It allows you to add commands to each area, so when that action occurs, the printer runs whatever commands you specify. This opens up some interesting possibilities.
For instance, my Maker Select Plus supports a command that writes text to the screen when printing via serial (USB). I could theoretically have it say what layer it was printing, or current fan spee, or whatever other information is available!
I love tinkering, and this opens up and this is my cup of tea.
According to the Pathio documentation, the intent is for scripts to support conditional logic as well, so slicing decisions can be made on the fly.
I may never need to touch these areas, but they will undoubtedly be useful for some users.
Keep in mind that the scripting section involves editing raw g-code. The risk of damage and fire makes this is a very bad place for experimentation. Only edit these areas if you know what you are doing.
Moving on. The Communication tab is disabled, this probably hasn’t been implemented yet.
That’s fine, since I’m using Octoprint anyways. I only need Pathio to do the slicing.
The Advanced tab only has two options currently. The firmware type, and the g-code flavor.
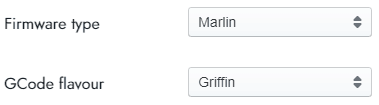
Firmware type has a dozen options, and ‘GCode flavour’ has three. This is a bit different from Cura, which just has the flavor option.
It’s not clear to me how these options interact.
The Firmware type is pretty straightforward – it’s whatever the printer is running. I know my Maker Select Plus is using an older version of Marlin, so that’s easy. However, I’m not sure what I should use for the g-code flavor.
The three options available are Griffin, UltiGcode, and None. Griffin and UltiGcode are specific to printers made by Ultimaker.
Since the Pathio documentation doesn’t seem to cover this, and I’m not using an Ultimaker printer, I guess I’ll select ‘None’ and see what happens.
Material Settings
That’s it for the printer configuration settings but before I can actually slice something, I need to tell Pathio about my filament.
Those settings appear to only be accessible by clicking on the printer name in the upper right corner of the window and selecting Edit Filaments.
It appears Pathio assumes you are using spoolWorks brand filament even if you choose the unnamed generic.
That’s fine. I’m sure I can change it by clicking the edit pencil.
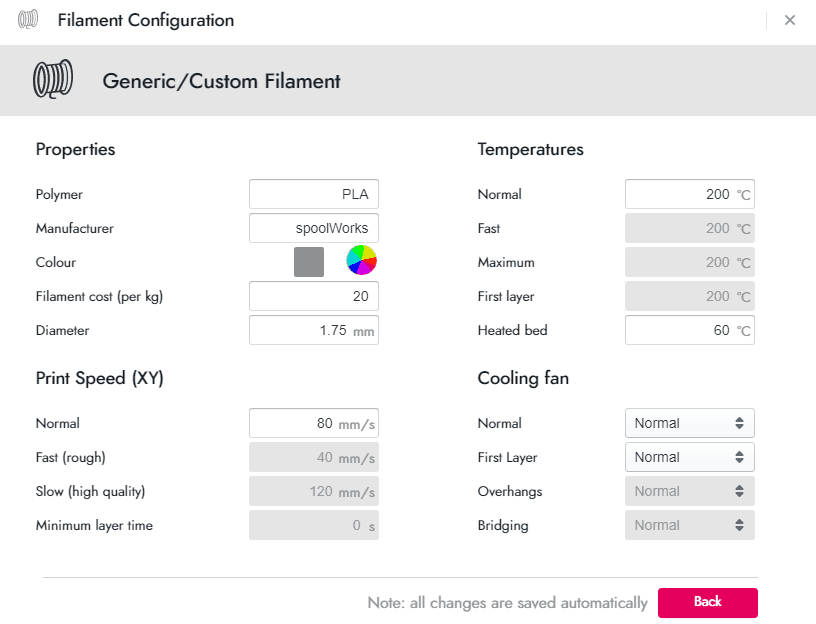
This brings up the customization options for that filament:
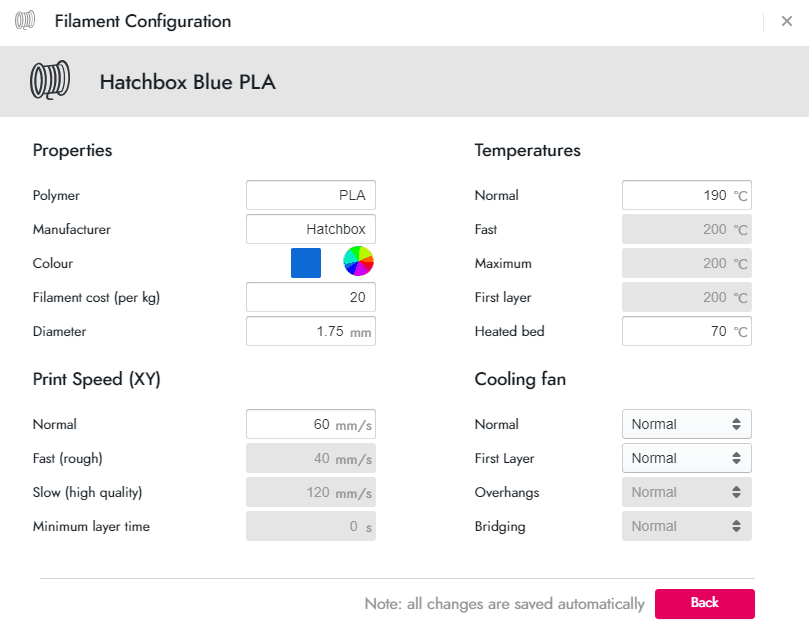
I’m going to do my test prints in blue Hatchbox PLA, so I’ll make a material profile to match.
Many of the options I would normally change are greyed out, including the first layer print temperature I was looking for earlier. That being the case, I’ll just set the Normal print temperature to 90° and see how it does.
Many of these greyed out options have values that don’t make sense. The fast and slow print speeds appear to be reversed, but again, this is a beta. As long as those settings don’t actually apply, it should be fine.
Glancing back at the Pathio site they specifically state this beta is not yet optimized for speed, so my above observations make a bit more sense now.
Filament configuration in Pathio also includes some options you wouldn’t necessarily associate with the material, such as cooling fan behavior.
This could be useful if you know your material has a specific cooling need.
I’ll leave the available options set to ‘Normal’ for now.
That should do it for my material profile. I could add more filaments, but one will be fine for a test.
Finally Slicing
I think we’re at a point now where I can actually test the slicer, but what should I test with?
The virtual build plate still has the purple Pathio icon in the middle of it, so I guess we could start there, but then how do I compare it to Cura? The model must exist somewhere. A quick dig into the Pathio install directory turns up an stl file named default_pathio.
Yep, that’s the one!
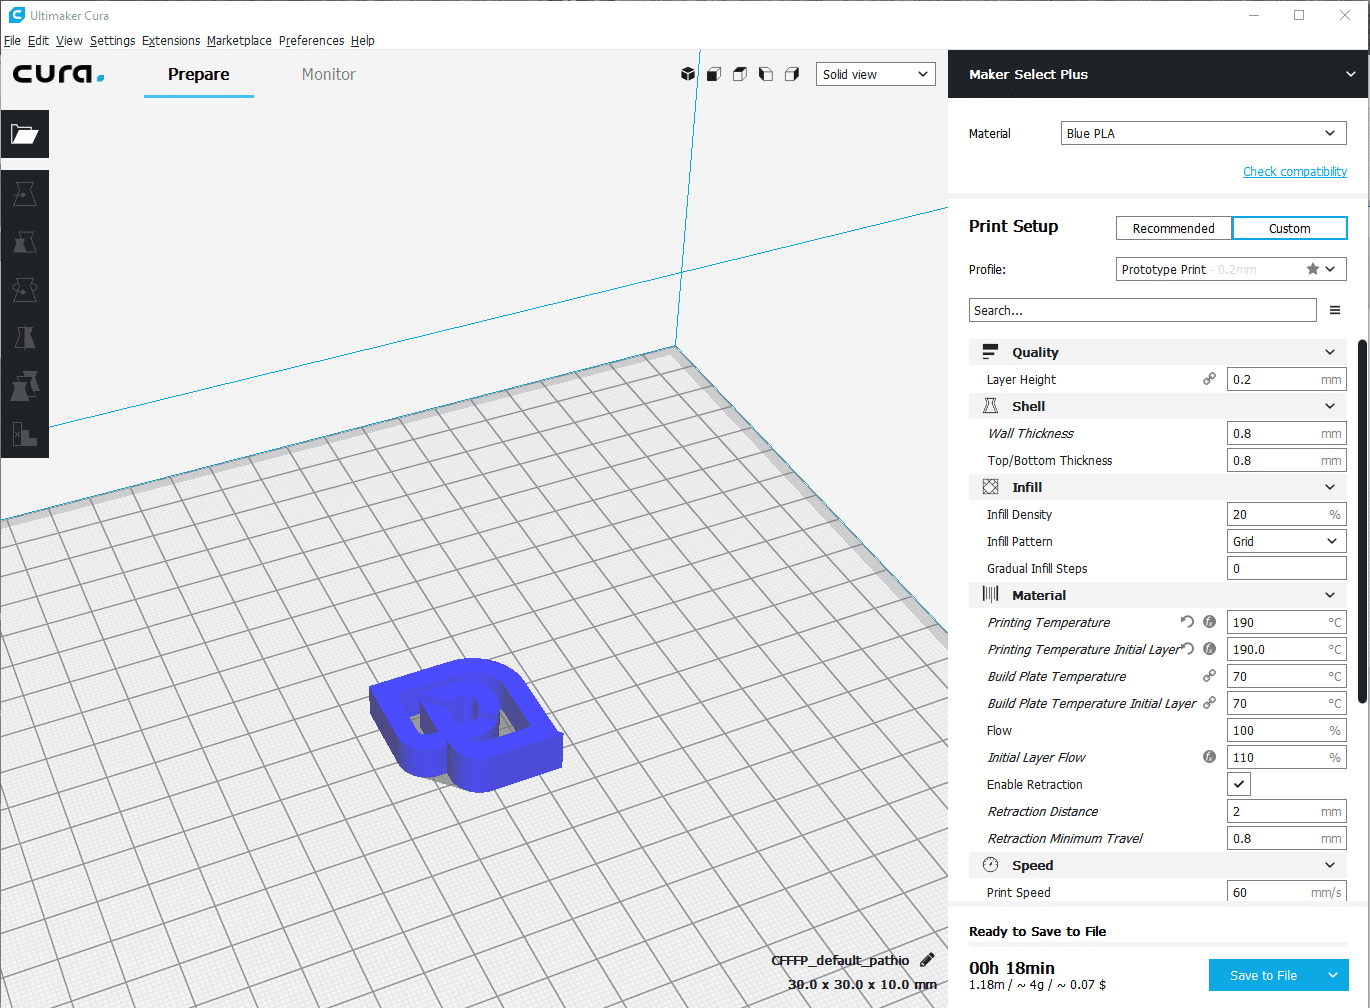
Now I just need to make sure the settings match between Pathio and Cura to make sure it’s a fair comparison.
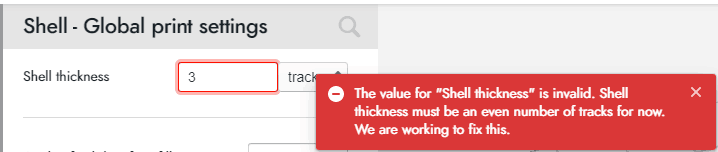
Let’s see. Infill of 10%, shell thickness of 4 tracks (1.6mm) in Pathio. That’s a little thick for a test print. I usually go with 1.2mm for basic prints in Cura. That would be three tracks in Pathio, but whoops! You apparently can’t do that right now. Beta issues:
Ok Pathio, have it your way. I’ll change Cura to match. That will require selecting wall thickness and top/bottom thicknesses of 1.6mm in Cura.
Pathio only has the one setting for the entire shell, which I’ll leave at 4 tracks.
Pathio makes some assumptions about print speeds. One of the things I notice right away is they already have the first layer print speed set to a third of the normal print speed. This is exactly the same ratio I set in Cura after some testing, mostly to help with first layer bed adhesion.
I think that’s good enough. Let’s hit the Slice button and see how they look side by side.
Slicing Comparison, Pathio vs. Cura
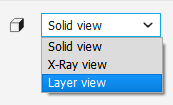
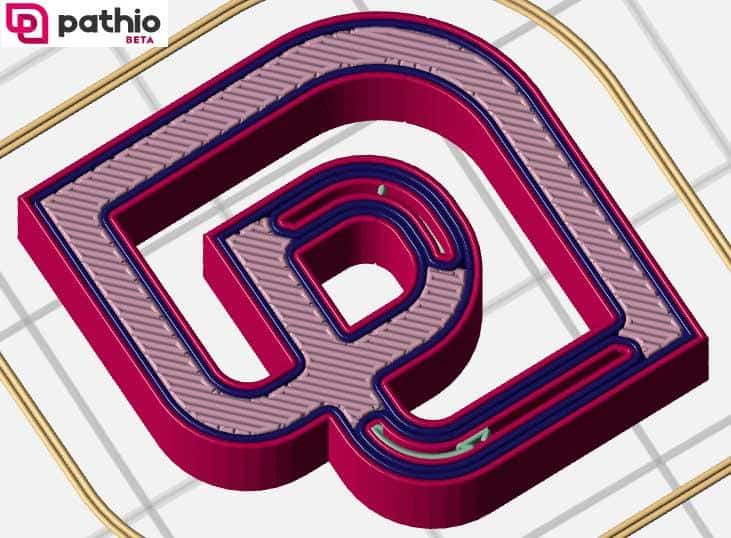
Hitting Slice in Pathio automatically takes you to the layer view. In Cura, selecting Layer View on the upper right corner of the build plate preview gives you a similar view.
As it turns out, dark blue doesn’t show up very well in Cura’s layer view. A quick color change, and here’s what we have:
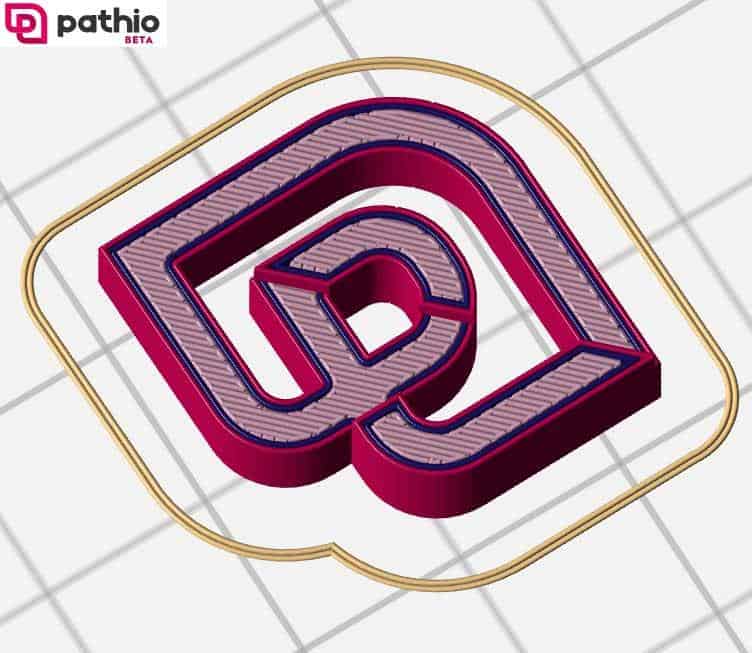
Pathio’s color coded tracks notwithstanding, right away you can see a difference in how the models were sliced.
Because Pathio looks at the entire shell as one piece, it can be more flexible than Cura about how it meets the shell thickness goal.
For the top layers, Pathio is only drawing two perimeters around a zigzag fill. The top and bottom continue this pattern for the number of layers necessary to match the shell thickness setting of four tracks, a.k.a. 1.6mm (actually a little farther, but I’ll cover that in a second).
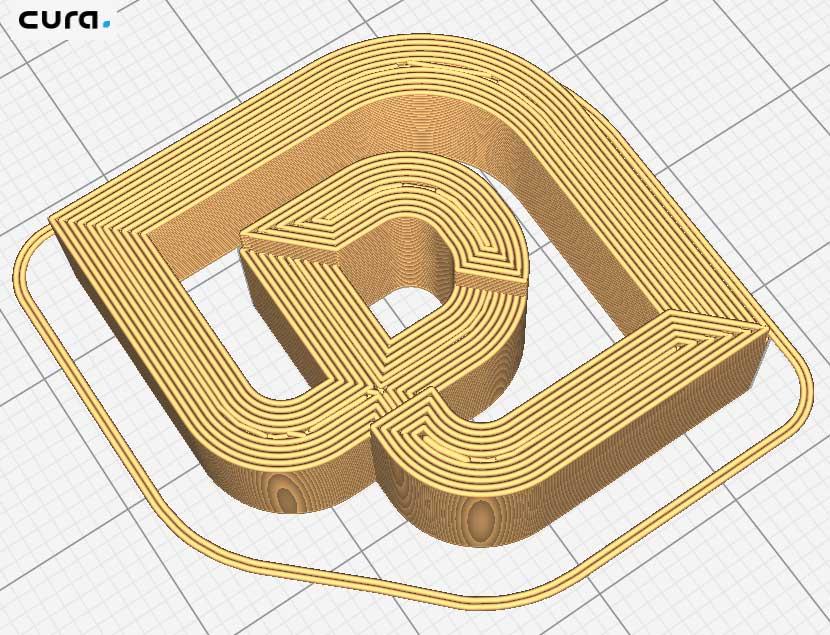
Cura dutifully draws the four tracks to meet the 1.6mm wall thickness setting all the way through the model. Since there isn’t enough space between all these tracks to fit a zigzag fill, at the top and bottom it just draws a couple more tracks at 0.4mm to finish it out.
Once they meet the required top and bottom thickness, both slicers switch to the specified 10% infill. Cura makes the switch exactly 1.6mm from the top layer, as specified by the top/bottom thickness setting, whereas Pathio waits until it completes the full 2mm thickness of the two top sections of the model, then switches to the infill percentage.
I don’t know how it makes that decision, but will be curious to see what other circumstances cause it to do that.
So, which of these shell options is better? In this case, it probably won’t make a significant difference in strength. 1.6mm walls is the PLA equivalent of printing a tank. However, there is a good chance Pathio’s method will result in a smoother top layer since the printer doesn’t have to try to fill in an odd width with a single track.
Moving the layer slider in both programs to 8.0mm (below the topmost features of the model), we can see that both have switched to 10% infill:
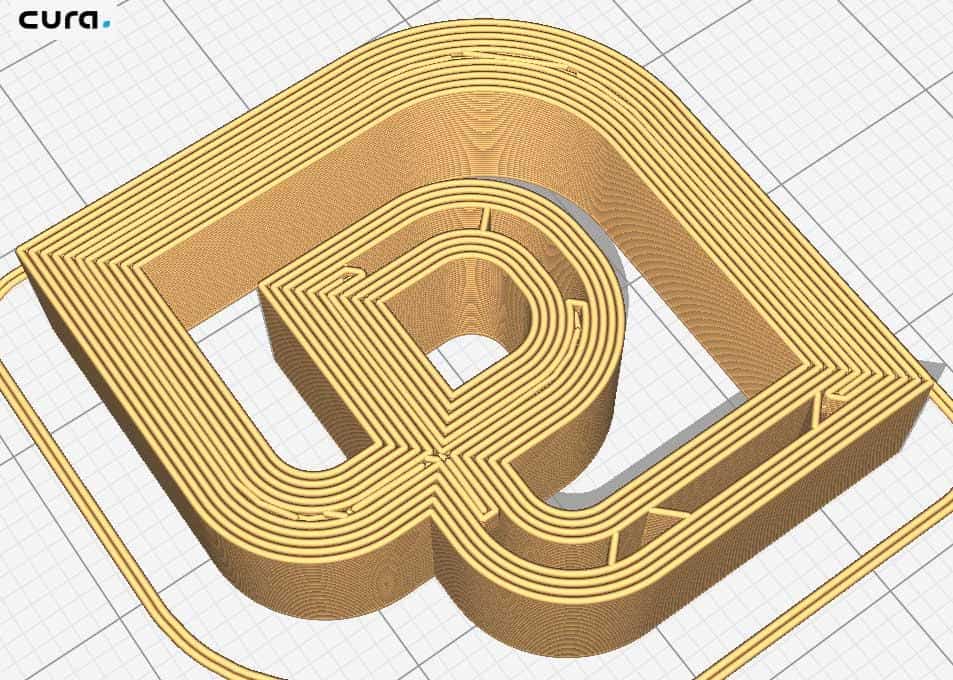
Cura’s infill is a consistent pattern at this layer, while Pathio’s looks a little odd.
As it turns out, it is actually doing something interesting that the developers talk about on their site.
While Cura has the same infill pattern between the bottom and top solid layers, Pathio changes the layout of the fill layer by layer, so the transition between the solid and 10% fill pattern is more gradual.
Once it is below the transitional layers, Pathio follows a consistent infill pattern until it gets down to the solid bottom layer, where it, again, switches to a zigzag pattern. As I mentioned before, Cura continues the same four tracks all the way to the bottom, where it fills in the small center areas with more individual tracks.
First Print Comparison
So, how do the prints compare? They’re both passable, but not perfect:
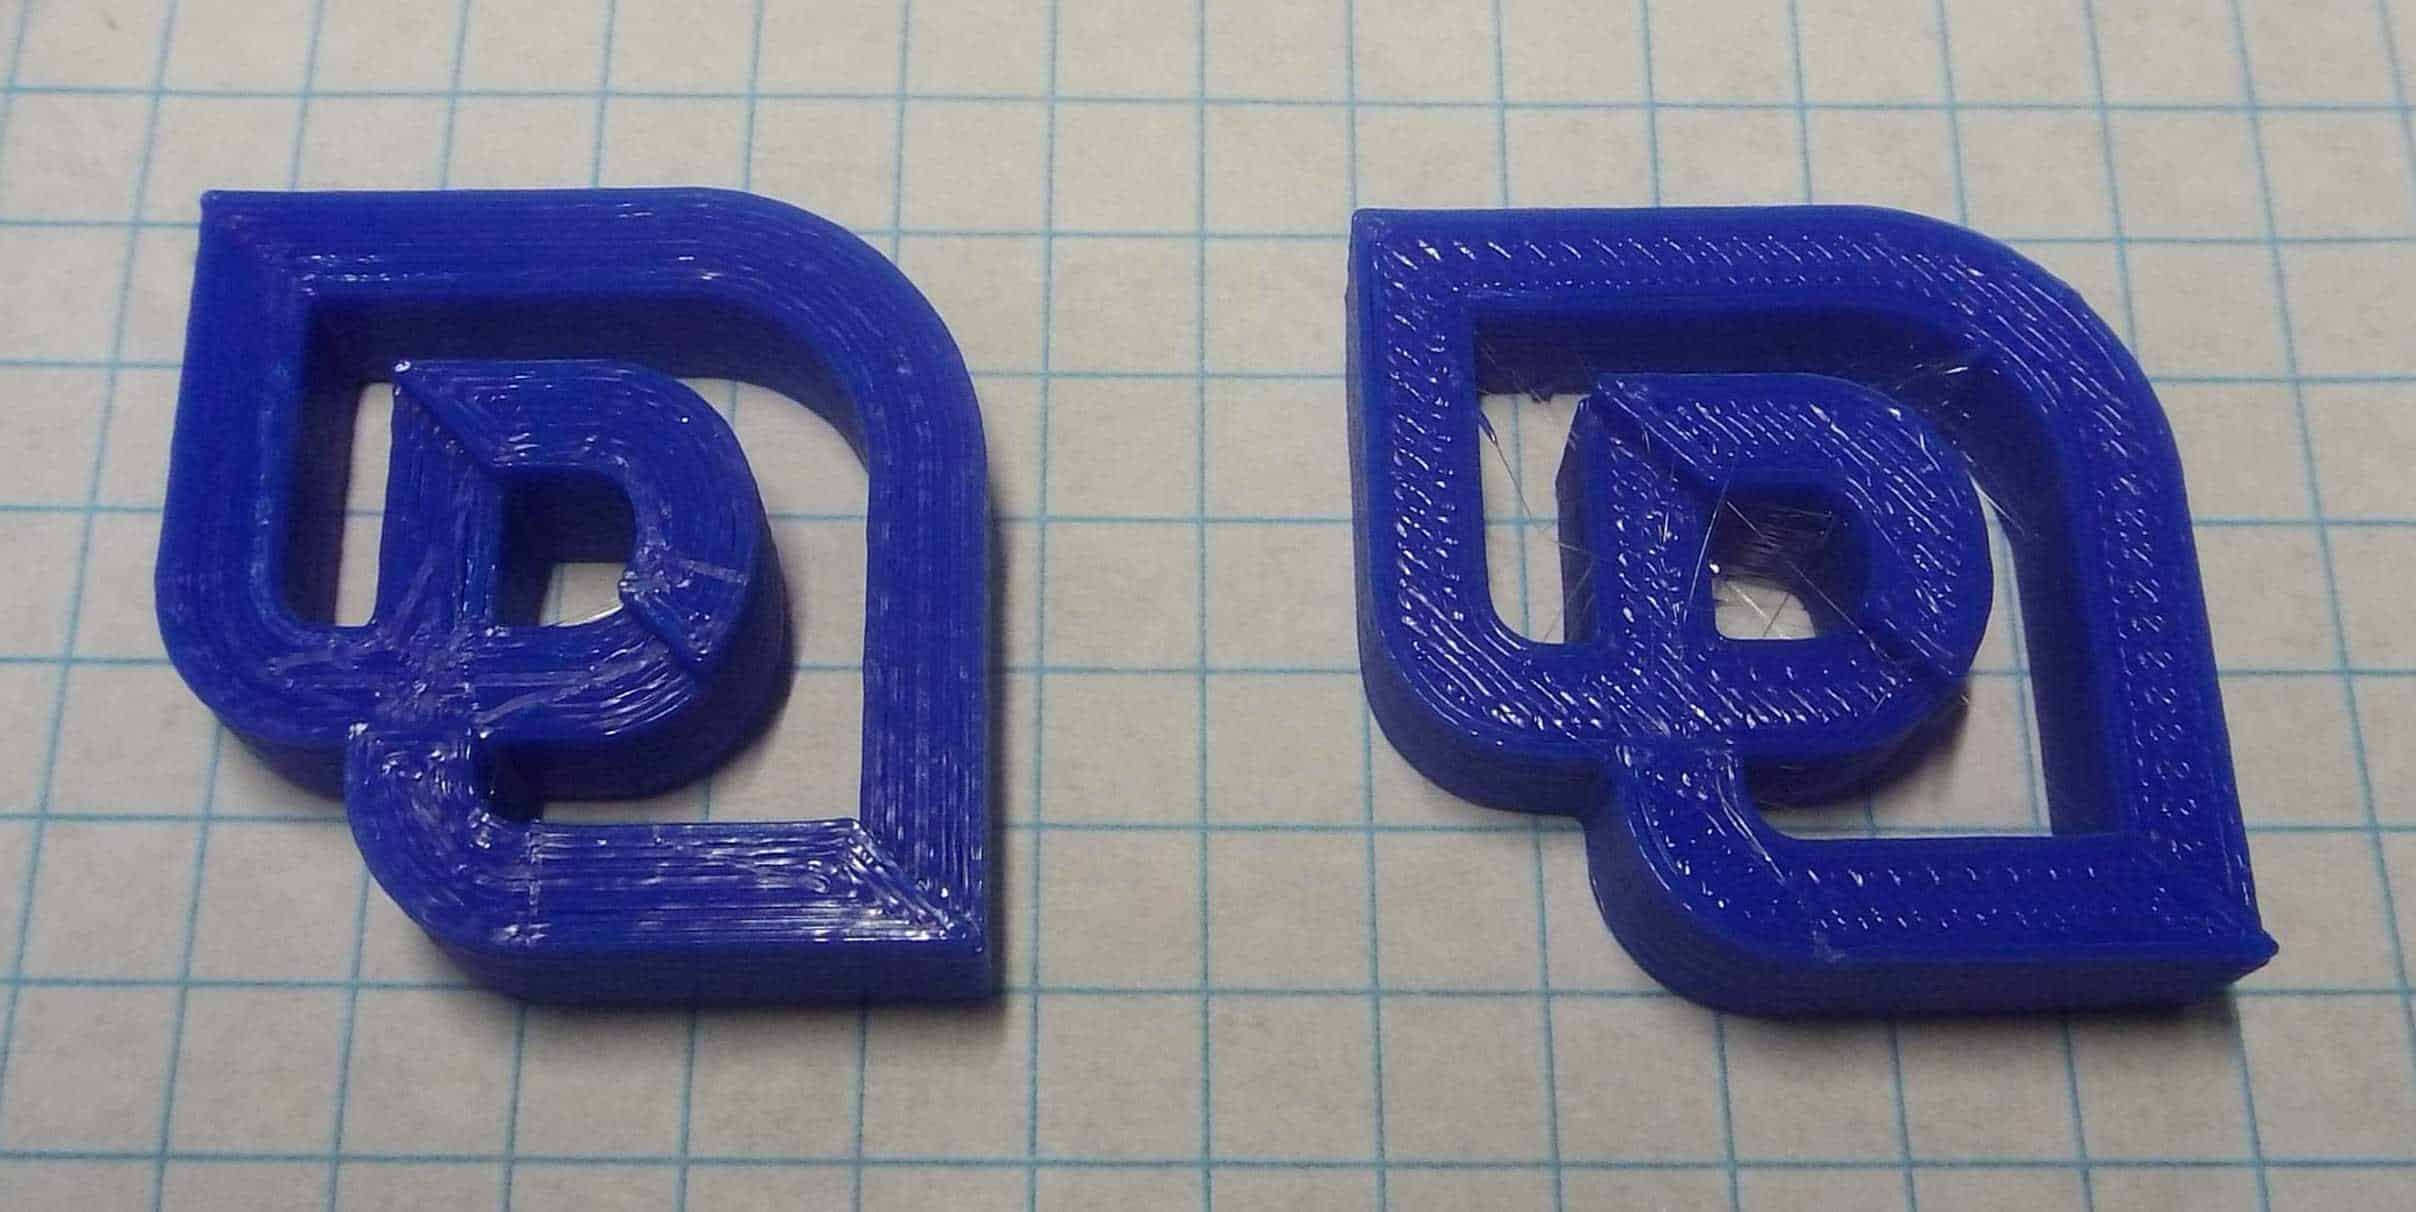
Pathio icon sliced by Cura (left) and sliced by Pathio (right)
The first thing I notice is the stringing.
The print sliced by Pathio is showing a lot more stringing than the one sliced by Cura. The retraction settings are the same, so there could be a couple of reasons for this.
First is that the two slicers don’t make the same pathing decisions. Watching them print, Pathio seems to jump around more, and the more gaps you span, the more opportunity there is for stringing.
Second, it is possible they just won’t act the same even with the same basic settings. To do a one-to-one comparison of the decisions each slicer is making I would have to look at the g-code.
Looking at the Cura sliced model, there are some gaps in the top layer, as expected, though they don’t show up well in the photo. It also appears that my z hop setting isn’t quite right yet. There are discolorations where the extruder appears to have traveled very closely over the top layer, indicating that it wasn’t lifting as intended.
On the Pathio sliced model, there are a few small gaps in the top layer, but the z hop setting appears to have kept the surface clean.
On the underside, there are some obvious bed adhesion issues, but I’m not necessarily surprised by this. I have spent some time tuning Cura to get the best possible first layer on my glass bed (without needing glue most of the time), and I haven’t done that with Pathio yet. Specifically, the model is showing a partially loose track and some curling on the corners.
Watching it print, I noticed Pathio’s default settings turn on the filament cooling fan as soon as the print starts, which won’t necessarily give the filament enough time to stick to the bed. Also, I have Cura extruding at 110% for the first layer, to squish a bit of extra plastic onto the glass. This helps with first layer bed adhesion and fills in any small gaps that might be present.
I haven’t seen a similar option in Pathio yet.
Second Print in Pathio
I’ll try slicing the Pathio icon once more in Pathio, but first I’ll need to change some settings.
First, I’ll turn the cooling fan off for the first layer (Filament Configuration -> Cooling fan -> First Layer), and I’ll increase the retraction amount to 3mm to see if it helps with the stringing (Global print settings -> Quality -> Retraction distance).
I can’t find a setting for a first layer extrusion multiplier. There is one for the entire print, but since my printer doesn’t have a general under-extrusion problem, changing the multiplier for every layer will probably mess up the print quality.
Hopefully turning off the cooling fan for the first layer helps enough.
After about forty minutes I have the results. The print looks nearly identical to the first one Pathio sliced. There is still some stringing through open areas, but changing the cooling fan setting fixed the bed adhesion issues.
Turning the print over, besides a couple of minor anomalies, the first layer looks very good:
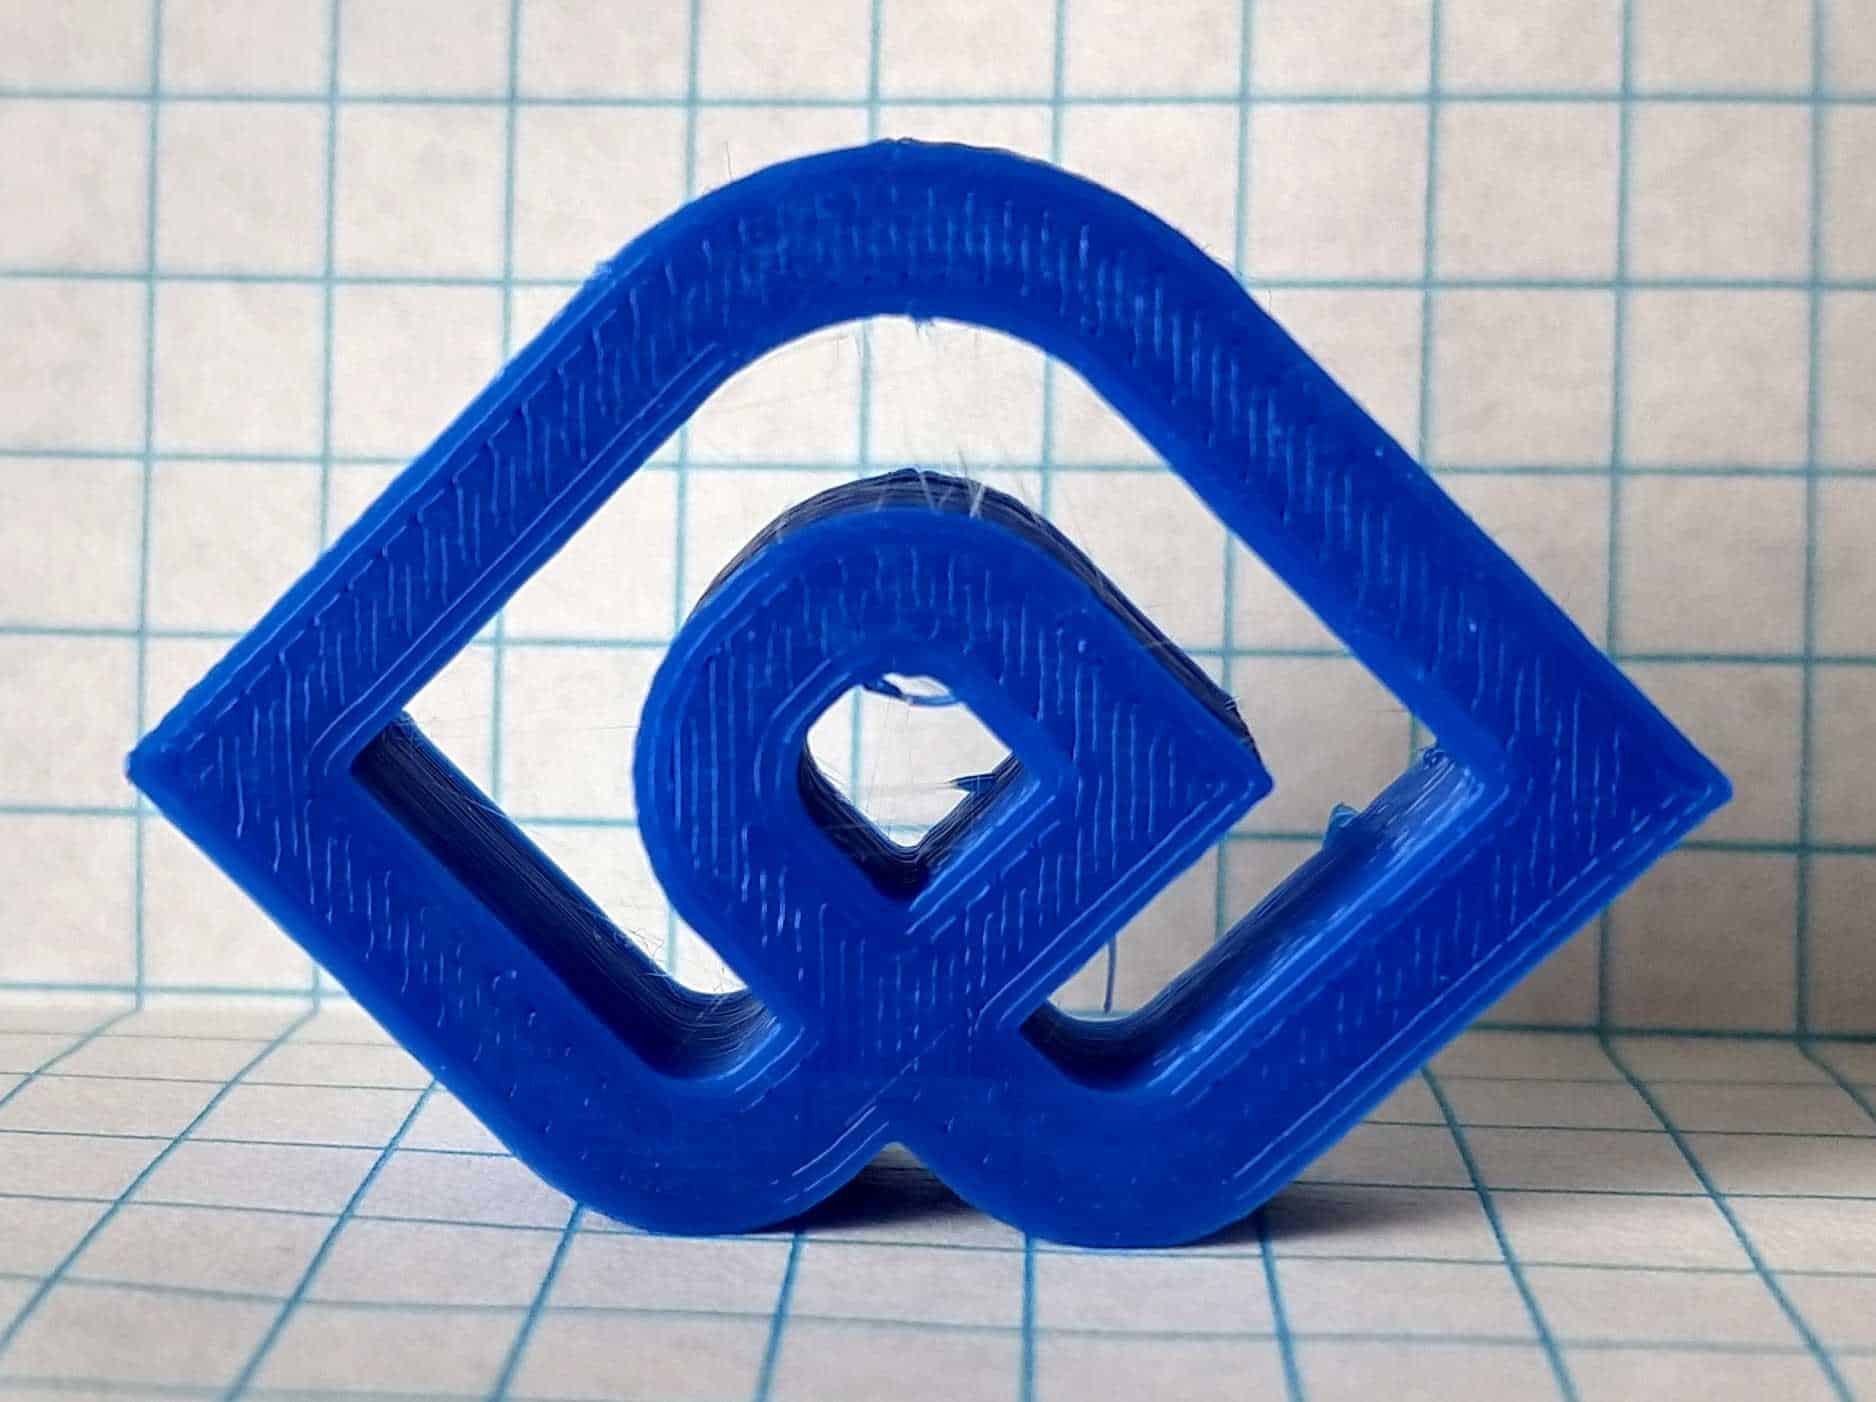
The infill is uniform, with almost no gaps, and there are no more loose tracks. The stringing is a little bothersome, but it’s on par with the amount I have on some of my Cura-sliced prints. It would be nice to eliminate stringing entirely, but that may not be possible with my printer.
The Road Ahead
At the start of this project, I posed a few questions. Here are my answers to those questions.
- Can they really deliver on their promises of creating a new core slicing engine that ‘does things right’?
- Does Pathio really solve real user problems?
- Is Pathio straightforward, but powerful and flexible?
- Will they follow through on their commitment to actively listening to the community?
Keep them in mind while we discuss the road ahead.
Pathio is clearly capable of producing good quality prints. That being said, we’ve definitely seen some places where the software is unfinished, or could be improved. That’s ok though! The whole reason for releasing a public beta is to get feedback from a broad user base. Clearly, the software team behind Pathio is confident enough in their product that they think people will want to use it, even in an unfinished state.
For the most part, I think they’re on the right track. Switching from Cura to Pathio isn’t the most intuitive process, but the developers appear to be making it as easy as possible.
The user interface elements in Pathio are easy to understand, and they make settings simple and easy to find. This contrasts with Cura’s dizzying array of options, which are sometimes buried under a couple of layers of sub-menus.
Those options do, however, allow for very fine tuning that Pathio cannot do – at least not yet. It will be interesting to see how it evolves as they continue development.
No beta is complete without feedback. As you use Pathio, it occasionally asks you how your experience has been. It takes any comments you make and sends them back to the development team, which uses them to make changes and fix bugs as they continue to work on the project.
They also have forums at https://community.pathio.xyz/ where the developers are responsive to questions and comments. The Pathio team is showing everyone they really think their success is tied to the opinions and needs of the 3D maker crowd.
Free Beta, Paid Full Version?
One thing you should know about Pathio going forward: while E3D has sponsored the initial development, the Pathio team and E3D are separate entities, and the intent is for the project to generate its own income stream.
What’s the best way to do that?
Charge people to use it, of course. Specifically, they plan on charging for Pathio once it is out of beta. The team has stated they want to have a free and pay version if they get enough traction. Capitalism demands it’s sacrifices.
This will probably turn some people off Pathio, but if it provides better quality prints and costs less than Simplify3D, I’ll consider it.
The Pathio team does say they intend to include additional features for that cost, such as online profile management, so it might be worth it if the final product is good.
Final Words
With these prints, I have only just begun testing Pathio. That being said, the results are looking good so far. With just a little tweaking I am getting prints that are similar in quality to what Cura can produce. There are some quirks right now (no odd-numbered track counts?), but these should get worked out by the developers over time. I think I will use Pathio as my primary slicer for a while so I can continue to test it. I will post updates to this page if I find something interesting or run into any major issues.