Learning how to use a 3D Slicer can be scary but it doesn’t have to be. Let’s get your slicer settings right with this Cura tutorial.
It’s no secret that proper 3D slicer settings dramatically affect your 3D printer’s performance, and the quality of the 3D models it prints. In general, 3D Printers are quirky machines that need very specific settings. If you’re new to 3D Printing it’s easy to get lost trying to ensure each setting is correct. Knowing more about your settings from the beginning will help you get the best prints, and help you diagnose any problems you encounter along the way. That’s why we are going to teach you how to use a 3D slicer with one of the most popular options, Ultimaker Cura.
As I’ve alluded to Cura has some pretty in-depth options. When you are getting into tinkering with your 3D Prints this is great, but it also means things can be confusing. What I’ve done in this article is laid out your settings in detail. I describe how to find them, and what they are.
Knowing the technical details of what things are and how to find them is important. However, if you are like me you like to know how other people are doing things. That’s why I’ve put my favorite part at the end. That’s where I’ll go through a real example of how my settings are set up, and why I made the choices that I made.
Why Ultimaker Cura:
First off, let me be honest. I put off learning about slicer settings for as long as possible, mostly because I’m pretty lazy when I can get away with it. When I purchased my first 3D printer in 2017, I bought a Monoprice Maker Select Plus, because at the time it was one of the best inexpensive, nearly fully assembled printers available. This meant that I didn’t have to spend time endlessly tweaking things. I could tighten a few bolts, level the bed, and get decent quality prints right away.
I also began by slicing custom prints in Slic3r, because I could just set my print area and filament dimensions and mostly leave the rest of the settings on the defaults. Again: lazy.
Slic3r worked fine for a while, but I found that it really doesn’t deal well with more complex objects. Some failed to slice at all. So, as my modeling abilities increased I needed a different solution. Grudgingly, I installed the most recent version of Ultimaker Cura.
One note: My issues involved the original version of Slic3r. I have not tried Slic3r PE, but I have to believe it works much better than the original, which at the time of writing hasn’t been updated in a while.
Why did I take so long to get to Cura
There isn’t anything wrong with using Cura. It’s a fantastic slicer with many advanced features. That being said, it wasn’t designed for lazy people like me. Likewise, for beginners who just want to start printing right away. To get good print results, you absolutely have to go through the settings. Even if Cura includes a profile for your printer, it’s guaranteed you will eventually need to change something to fit what you’re printing. To be able to do that, you have to understand what the different settings do. Let’s get to it.
A Quick Note for Fresh Installations of Cura
If you are running Cura for the first time, once it loads and you have accepted the user agreement, it will immediately open the Add Printer window. Since everything Cura does is related to the chosen printer, it won’t let you skip this step. If you don’t know what to do here, no problem! Jump down to the Printers section of this article where I cover adding printers.
Preferences
In Cura, the Preferences menu holds just one item: Configure Cura. This is an easy way to get to all of Cura’s settings. We’ll go through each section one by one.
General
This menu holds options that control the basic behavior of Cura, such as the look and feel of the application and how you zoom around its representation of the build plate. It also controls what models do by default when opened for slicing. Most of these settings have to do with personal preference and what control scheme you are used to. The defaults have worked fine for me so far, so I haven’t changed anything. However, I may have to try out Cura’s dark interface theme, added in version 2.7. That option is available here in a drop-down menu titled Theme. For the dark theme, change it from Ultimaker to Ultimaker Dark and re-open Cura.
Settings
Options in this menu are all about what settings are visible on the right side of the Cura main window. It doesn’t necessarily activate the settings that you check, it just makes them visible in the main window so they can be used later.
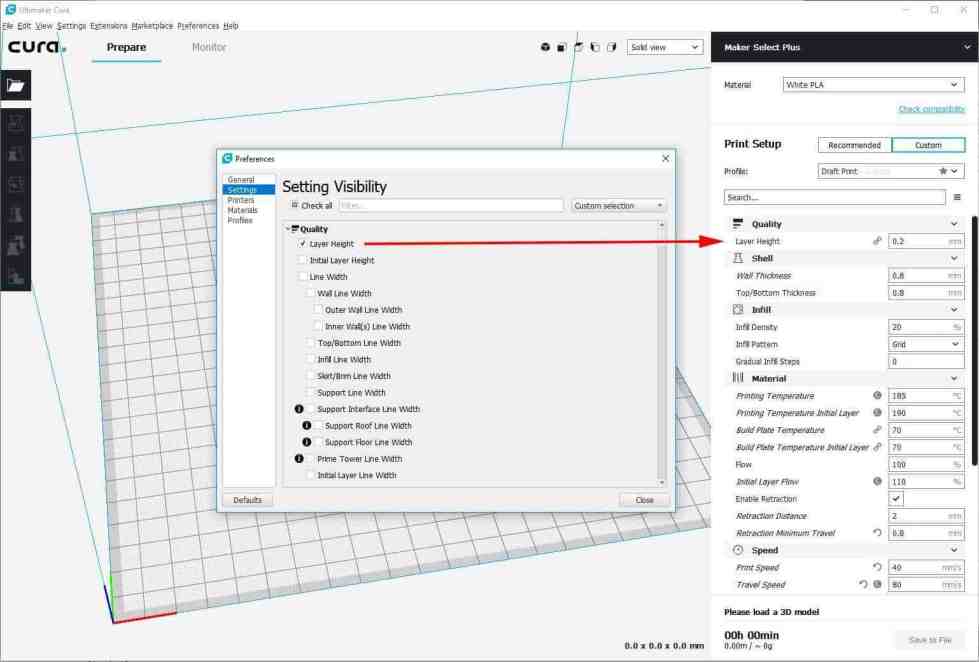
A quick way to access this menu is to click on the gear icon that appears if you mouse over a setting header on the right side of the main window. This will take you to the corresponding section in the Settings Visibility menu.
Printers
This is the menu where printer profiles can be added, removed, or modified. To add a printer, just click the Add button. The next steps are the same for adding additional printers, or for adding your first printer during the initial setup of Cura.
When adding a printer, the first screen asks you to select a model.
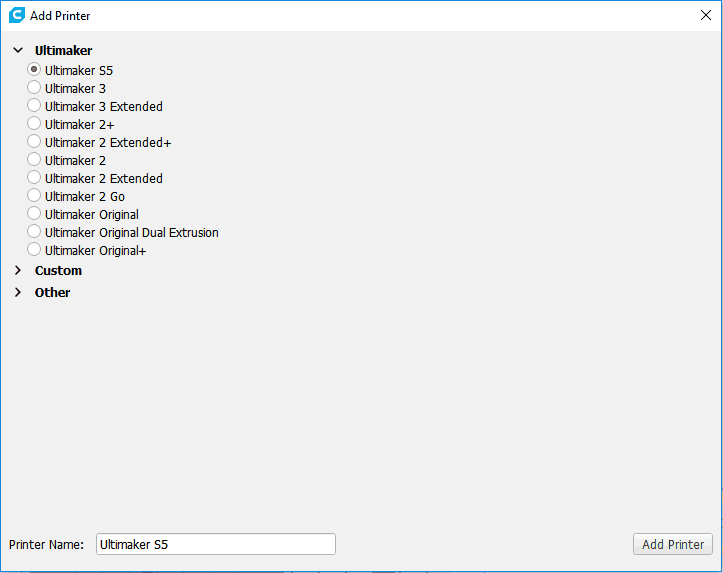
It shows Ultimaker models first, which isn’t surprising since Ultimaker develops and releases all the official versions of Cura. That being said, the ‘Other’ section has an impressive selection of profiles for third-party printers. If your printer is listed, you can just select it and be done with the basic setup. All of the important details will be selected for you. However, if you’re like me and your printer isn’t listed, Cura will need a bit more information from you.
The printer I am using is a Monoprice Maker Select Plus. Cura does include a profile for its analog, the Wanhao Duplicator i3 Plus, but I’ve made some modifications to my printer since I bought it. I’m not sure the original settings will still give the best results, so I’ll just add a custom printer and set it up manually.
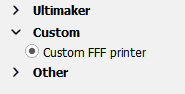
If you add a custom printer, give it a descriptive name at the bottom of the window and click ‘Add Printer.’ This will add it to your list of printers and immediately open the Machine Settings window.
Machine Settings: Printer Tab
Clicking on Machine Settings for a printer will take you to the configuration window for that printer. Here are the settings under the Printer tab for my Maker Select Plus:
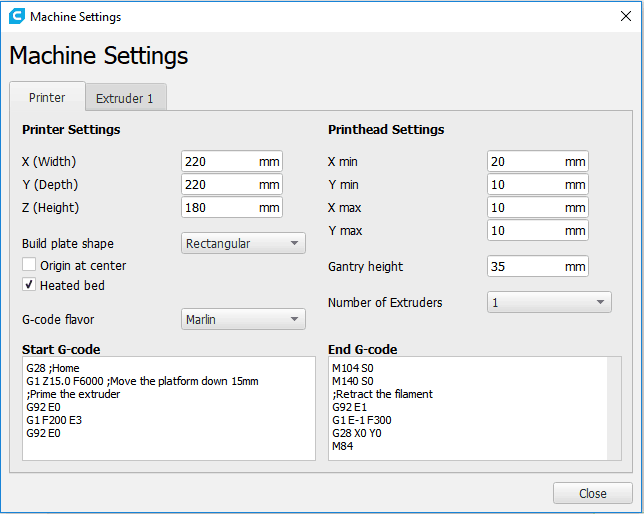
Printer Settings:
The Printer Settings section has fields for the size of the bed (X and Y axes) and maximum build height (Z-axis). Some of these are the defaults. Others I had to input manually to match my printer. That’s ok though. Even the most rudimentary manual will include the build area and nozzle dimensions.
This section also has options for build plate shape, the origin location, bed heat, and ‘G-code flavor.’
Build Plate Shape
For the build plate shape, you can choose rectangular or elliptical. A cartesian printer like my Maker Select Plus will typically have a rectangular build plate, whereas a delta style printer will have an elliptical one. Related to this, the Origin at Center option tells Cura that you want the printer to use the center of the build plate as the home position. This generally only applies to delta style printers. If you would like more information on the different styles of 3D printers, please see our article about the Four FFF Printer Styles.
Select the Heated bed option if you know your printer has a heated build surface. The manual will definitely say if it does, if for no other reason than they need to warn you about the risk of burns.
G-Code Flavor
For the G-code flavor setting, Cura includes nine different options. Let’s stop here for a second and define what we’re talking about.
For those new to 3D printing, g-code is just written instructions for the printer to follow. It’s plain text that spells out every movement and other commands the printer needs to follow to create the model you are slicing. It’s been in use by industrial tooling, such as CNC machines, for decades, and was adapted to 3D printers because many of the concepts are the same. There are many variants of g-code, which is why Cura has an option to specify which one your printer uses, referred to as the ‘flavor.’
For pre-built profiles, the ‘G-code flavor’ option should already be set to the correct type, but if you are adding a custom printer, you will have to find out what one to use. Fortunately, 3D printing has a lot of active online communities, and a quick search should get you the information you need. It mostly comes down to the type of firmware your printer is running.
Mine, for instance, is using a version of Marlin. The topic of different printer firmware and g-code types gets very technical very fast. The important thing to know here is that they don’t all operate the same, so it’s important that you select the best option for your printer.
Printhead Settings
The Printhead Settings section only applies if you are planning to do what Cura calls ‘one at a time printing,’ where if you have multiple models added to the bed, Cura will write the g-code to finish each object one at a time instead of doing them together one layer at a time. This can reduce some problems, such as filament stringing between objects, but if you plan on printing this way it is very important that you use this section of the settings to tell Cura the distance between the extruder nozzle and the rest of the print head, or it is virtually guaranteed to crash into something while moving between finished models.
Start G-code and End G-code
The Start G-code and End G-code sections tell Cura what you want the printer to do at the beginning and end of each print. The above settings are the defaults, which do some basic housekeeping tasks, such as homing the extruder at the beginning of a print and turning off the hot end and bed heat at the end. Unless you have done some research, these settings will look like complete gibberish, but as long as your printer is doing the things you need to it to at the beginning and end of prints, do not change them. Incorrect changes to these settings could seriously damage your printer and/or be a potential fire hazard. Editing g-code is a whole different level of 3D printing that is outside the scope of this article, but I plan to cover some basics in another article soon.
Machine Settings: Extruder Tabs
Since I have the number of extruders set to one in my printer settings, there is only one corresponding extruder tab to go with it: Extruder 1. This tab has a fairly small number of options but contains the absolutely critical Nozzle Size and Compatible Filament Size settings. If these do not match your printer, getting decent print quality is basically impossible.
Nozzle Settings
Currently, my printer has a 0.4mm nozzle on it. This is a standard size that most FFF printers come with, but they can be changed easily to fit your needs. Most common sizes range from 0.2mm up to 1.0mm, with others available if you search around a bit. The size of the nozzle mostly affects the level of detail (resolution) the printer is capable of. For instance, the 0.4mm nozzle on my printer is perfect for day-to-day objects, but if I were going to start printing miniatures for tabletop gaming I would want to switch it to a 0.2mm nozzle to better handle the small details.
Filament Diameter
The extruder on my printer is designed to use 1.75mm filament, but yours may not be. Currently, there is a good mix of printers that use 2.85mm filament instead. It all depends on the design considerations the printer manufacturer made when they developed it. One size isn’t necessarily better than the other, it’s just important that you know which one your printer uses so you can purchase the right material.
One thing to keep in mind with filament sizes: the diameter of the filament is nominal, meaning it isn’t going to be exactly that diameter for its entire length. Manufacturers will do their best, but there are limits to the precision they are able to achieve on low-cost goods like a plastic filament. Reputable manufacturers will have the tolerance value right on the package, which allows you to adjust your filament profiles to match. I will cover that in the Materials section below.
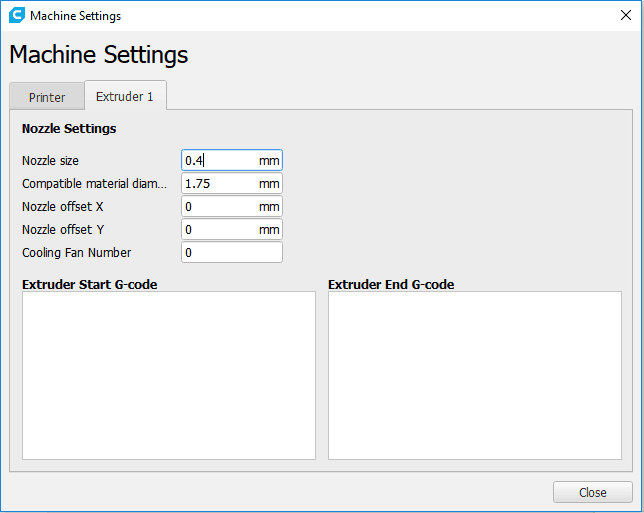
Nozzle Offset
The Nozzle offset options only need to be changed on a single extruder setup if the nozzle on your printer is not where Cura assumes it is on the print head in reference to the printer home position. Let’s break that down.
When a printer receives the home command, it will move the print head to a predefined position (home). On a cartesian printer, that is usually the lower left corner of the bed. On a delta printer, that is usually the center of the bed. Cura assumes the nozzle is in the middle of the print head, so when the print head is in the home position the nozzle is either exactly in the corner or exactly in the middle of the bed, depending on the printer style. If that is not the case, the nozzle offset values tell Cura exactly how far off of home the nozzle is so it can adjust print commands to ensure it doesn’t accidentally run off the edge of the bed.
On a stock, single extruder printer these values usually do not need to be changed from the default of 0.
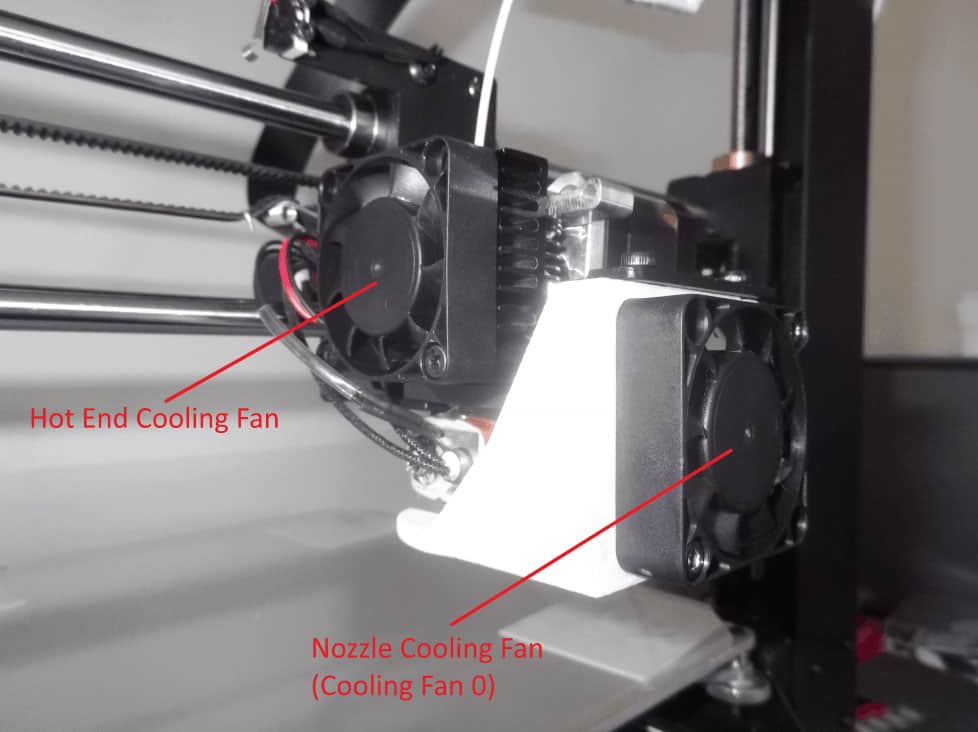
Cooling Fan Number
The same can be said for the Cooling Fan Number. Most 3D printers only have one nozzle cooling fan (a.k.a. Filament cooler), which is fan 0. The fan number is essentially the address that the printer sends fan commands to. In this case, it’s like a street with only one house on it, and the addresses start at zero. However, if you had a dual extruder printer, there would be two houses on the street, addresses zero and one.
What you don’t want to do is tell the printer to send commands to an empty lot, so make sure not to change the cooling fan number unless you have a good reason.
Keep in mind, your printer may have more than one fan on it, my Maker Select Plus has two: the hot end cooling fan, and the nozzle cooling fan. On my printer, the hot end fan is always running if the printer is turned on. It’s wired directly to the power supply and cannot be controlled. The nozzle cooling fan (fan 0) is the one that Cura can write instructions for based on the specified cooling fan number.
Here is what it looks like on my Monoprice Maker Select Plus:
Extruder Start and Extruder End G-Code
Finally, the Extruder Start and Extruder End G-code sections can also generally be left alone. These fields are intended to hold g-code that is specifically for that extruder, an idea that makes more sense on a multi-extruder printer. For instance, on a dual extruder printer, you may want to prime extruder 1 at the beginning, while at the same time retracting extruder 2 so it doesn’t leak while waiting for its turn to print. On a single extruder printer, Cura just writes the beginning and ending instructions into the printer Start G-code and End G-code fields as mentioned a few sections ago.
Materials
Back in the main preferences window, The Materials menu allows you to select material profiles for many different types of 3D printing filaments. These profiles allow you to fine-tune print settings for different types of filament, allowing you to quickly change material types in the Cura main window without having to think about individual settings – once you have them set up of course. It includes built-in profiles for many popular filaments, but my manufacturer of choice, Hatchbox, was not listed, so I started from the included Generic PLA profile and created some Hatchbox profiles myself.
Profiles can also be imported if you get them from a manufacturer or 3D printing community group.
Filament Tolerance
As I mentioned in the extruder settings section, the listed diameter of the filament isn’t exact. I am using all 1.75mm filament, but my copper PLA has a manufacturing tolerance of +/- 0.03, and my white PLA has a tolerance of +/- 0.05. This means that the diameter of my white PLA could range from 1.70mm to 1.80mm. That doesn’t seem like a lot, but Cura uses the value of the filament diameter to determine how fast the extruder needs to run to meet the material needs of the print. If the size is off by 0.05mm for an extended length, it could cause the printer to extrude too little, or too much filament. I haven’t had this issue yet, but it’s entirely possible you could.
So, if you notice, for example, that your printer tends to under-extrude when using a certain type of filament, check the manufacturing tolerance. If it has a tolerance of +/- 0.05, try changing the diameter in the material profile to 1.70mm (assuming a 1.75mm extruder) and see if it improves. It won’t hurt anything to try.

Cost Tracking
One of the additional things I recommend you set up is material cost tracking. It requires you to input some specific information about the filament as shown above: density, diameter, filament cost (entire spool), and filament weight (entire spool). All of this information should be available from the manufacturer. Once this information is entered, Cura will give an estimated cost per meter and will display the estimated total cost of each print near the lower right corner of the main window once it has finished slicing a model. It is worth the extra time to do this.
Profiles
The last settings menu holds printing profiles. This allows you to define print settings or select from some basic ones Cura includes. The primary purpose of these profiles is to define the basic parameters the printer will use to create the object so you don’t have to change them individually. A couple of the main differences you would often have between profiles are layer height and infill. We will cover these in detail next.
Putting it all together: How I Recently Set Up Cura
I promised I’d give you a real-world example, and here it is. Not long ago I made a filament cooling duct to help with an overhang problem I was having. These are the settings I used. On a side note, if you are interested please check out my article about why I made the cooling fan duct.
I hope this helps clarify what we talked about above. If you have any questions I don’t cover below leave them in our comments, please. OK, on with the example.
Back in the main window, you will see the build plate as you defined it, and all the print settings along the right side. I’ll go over some options using my filament cooling duct.
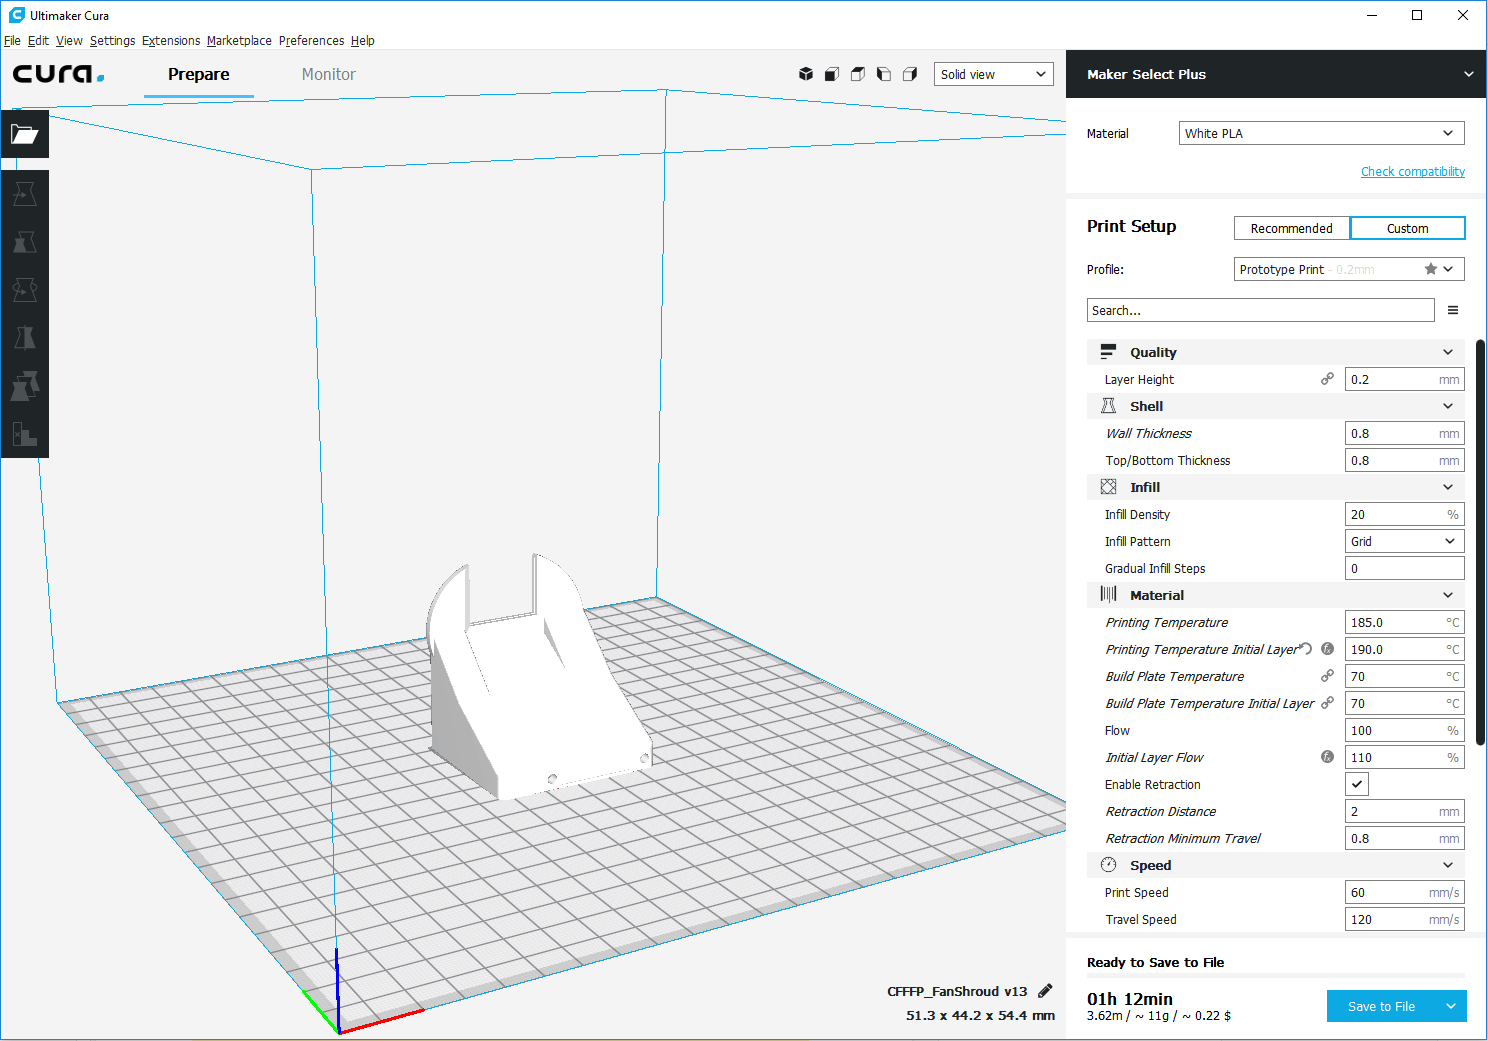
Material Selection
At the top of the settings on the right side of the window, you’ll notice my material is the white Hatchbox PLA I defined, and the color of the model on the virtual print bed matches that. In actuality, since my printer only has one extruder it really doesn’t matter what color Cura says it is, the printer will use the spool I have on it at the time. However, if I had a dual extruder model, the material I had defined for each extruder would matter a lot!
By default, Cura will use the settings defined in the material profile to determine things like nozzle and bed temperature. However, these can be overridden manually or by the print profile you choose. We’ll go over those more in-depth in a couple of sections.
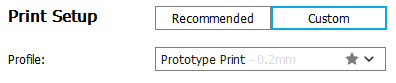
Print Setup
Next, I am using a custom print setup with a draft print profile I set up with a 0.2mm layer height. For most prints, 0.2mm is considered adequate quality. If you go higher the individual layers are more visible and lower the prints can start to take a very long time.
Quality
Keep in mind that your printer may have preferred layer heights that are not a simple multiple. For example, because of the Z-axis motor it uses, the Creality Ender 3 gives the best results if it uses layer heights that are a multiple of 0.04mm. It can print at 0.1mm, but it will give more consistent results at 0.08mm or 1.2mm. These types of values are commonly referred to as magic numbers. With a little bit of research, you may find some for your printer as well.
Shell
For the shell of my duct, I am using a wall thickness of 0.8mm. That’s two times the diameter of my 0.4mm extruder. Remember the extruder size when you are designing things to print. If you stick with multiples of the extruder diameter when you design and when you select a wall thickness, you will get more consistent results. 3D printers can deal with differing diameters by changing the extrusion speed as it relates to the movement of the nozzle, but if you have a choice, try to stick with simple multiples.

You can do a similar thing for the top and bottom thicknesses, where I am using 0.8mm – exactly four times the chosen layer height.
Do keep the strength of the object in mind when choosing thicknesses. Larger wall thicknesses will be stronger, though there is a point of diminishing returns. Very large values will be strong but will increase cost and print time significantly, so only use them if you know you need that strength. Cura’s default wall thickness for 0.4mm nozzles is 1.2mm, which is a decent choice for most prints.
The 0.8mm value I’ve chosen here is thin enough to be pretty fragile, but I did that on purpose to maximize the space available for airflow. I will have to wait until the bed is completely cool before trying to remove it though, or it will probably break.
Infill
The infill setting doesn’t apply to this print (it’s completely hollow). For those new to 3D printing, infill refers to how much material the slicer will use inside solid objects – how filled in it is. I have found that the default 20% infill is fine for most solid objects, but it’s easy to increase it if you need a stronger print or to set to zero if you want to hollow out an object that wasn’t originally designed that way.

Keep in mind, the infill setting affects print time a lot. An object with 100% infill will be very strong but will take far longer to print than the same model at 20%. Also, consider the type of infill you need. Cura provides over a dozen different infill patterns depending on what strength properties are needed. The default Grid setting is fine for an object that may have force exerted downward on it, but if you are printing something that might get pressure on multiple sides, you will want to use a three-dimensional infill, such as Cubic, instead.
Gradual infill steps will tell Cura to reduce the infill density as it gets farther from the top of a model. Specifically, it determines how many times to reduce the infill density by half. Here is how the layers would be divided on a simple cube using one gradual infill step:
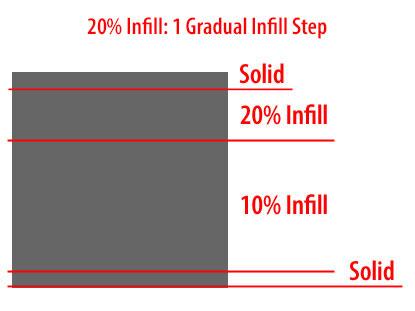
The top and bottom are solid, as defined by the Top/Bottom Thickness setting. The selected infill of 20% near the top. Lower on the cube, where strength is less important, Cura halves the infill to 10% based on the specified 1 gradual infill step. If you chose two gradual infill steps, Cura would halve the infill again, to 5%. Exactly where these transitions occur depends on the height of the object.
Material Settings – Getting More Specific
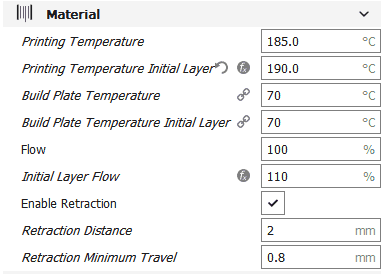
Next, are the material settings that I defined earlier in the configuration menu. Notice that a couple of the options have the little f(x) symbol. This symbol means that option is usually calculated based on another option but is currently being overridden. For instance, I have set the printing temperature for the initial layer to 190°, five degrees higher than the standard temperature I defined in my printing profile. I am using this higher temperature to promote better first layer bed adhesion for this print.
Temperature Settings
A printing temperature of 185 degrees Celsius is near the bottom of the range for my filament, but my print has some significant overhangs, so I want to keep the temperature down so the filament can cool as quickly as possible.
In contrast to that, my build plate is set to a toasty 70 degrees Celsius for the duration of the print. Before adding a glass plate to my print bed I was printing at 60 degrees without issue, but I now have the glass floating above the heated aluminum on silicone thermal pad, so I’ve added ten degrees to account for losses transferring between the two.
Also, I found with this setup that I could no longer reduce the build plate temperature after the initial layer because the prints tended to unstick from the glass. This is why both my initial and regular build plate temperature values are the same.
Whenever you make a change to your printer, you may have to tweak some settings to get the best performance you can. It takes some trial and error, but it’s well worth it. My glass bed made the entire build surface much more level, allowing large objects to be printed without having to worry about the aluminum warping around the edges.
Flow Rates

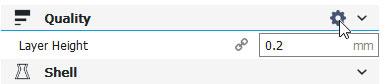
My initial flow rate is set ten percent higher than my regular flow rate. I changed this to counteract some first layer problems I was having. An increased initial flow rate causes the printer to squish a little more filament out during the first layer, which makes it fill in nicely on the bed. The Initial Layer Flow setting isn’t visible by default. You have to enable it by going to that section of the Settings configuration window. This is most quickly done by clicking on the gear icon on the Material header.
Retraction Settings
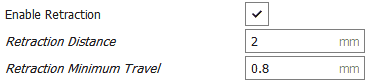
Cura has retraction enabled automatically on most printer profiles. If you’re not familiar with retraction, what it does is reverse the extruder so the melted filament in the nozzle is drawn upward a set amount when the print head has to travel from one area to another. This can reduce or, ideally, eliminate the thin strings that sometimes connect separate points (stringing).
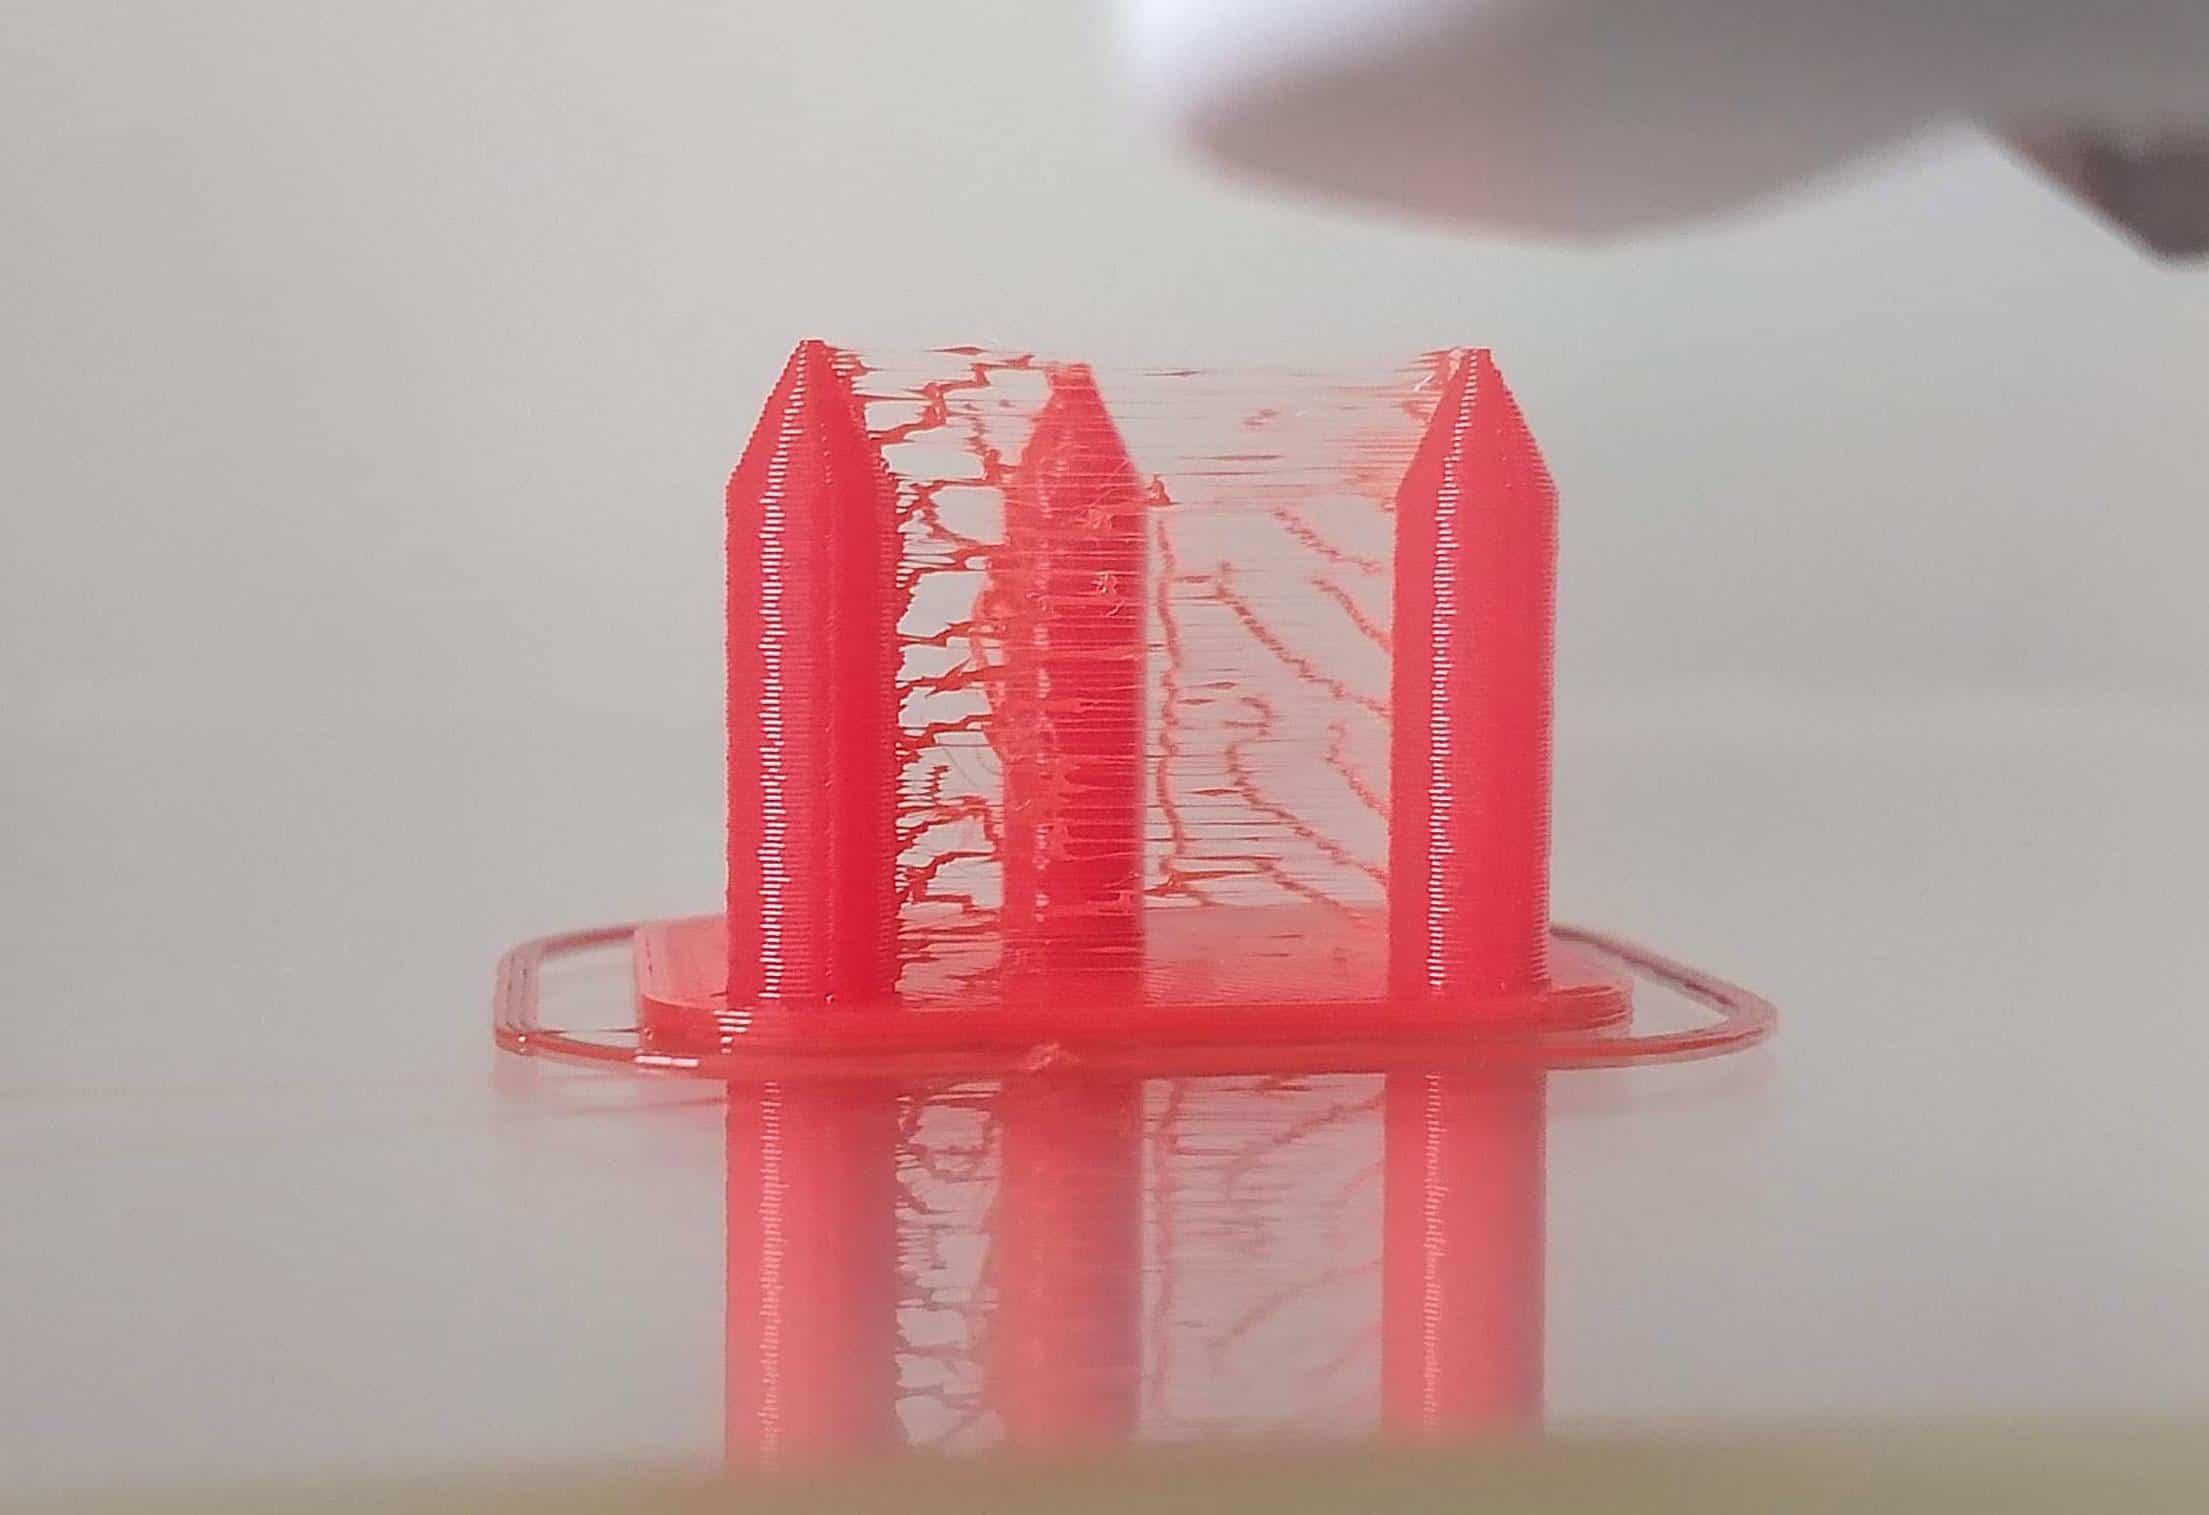
I’ve tried printing with the default options, and I’ve printed with retraction turned off. Both resulted in poor performance from my printer. With the default retraction distance of 6mm, my printer was under-extruding after it traveled. With retraction turned off, my prints had a crazy amount of stringing (as seen above). I’m still fine-tuning, but it appears a retraction distance of 2mm mostly eliminated stringing.
The minimum travel distance can be changed. However, the value that is automatically calculated based on shell dimensions is generally fine.
Print Speed
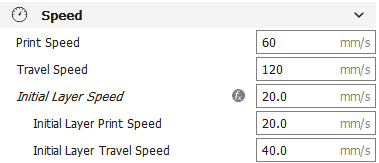
For print speed, I have found that my Maker Select Plus will produce good quality prints reliably at 60mm/s. With some more tuning, it’s possible it could print faster. I would probably have to get a much heavier table to keep the shaking to a minimum. That being said, notice that I have set the initial speed to a third of the regular print speed. This is mostly to help with bed adhesion. (Have I made it clear enough how many factors are involved with bed adhesion?).
Cooling
Scrolling down on the settings, I have cooling enabled, which is the default and highly recommended. This relates directly to the next section.
Supports

For this print, I do not have supports enabled. I designed the duct to print fine without them as long as I have cooling enabled to harden overhangs as fast as possible. If I did need supports, however, one of the things I like about Cura is the Support Placement option. You have a choice of generating support everywhere, or just where unsupported structures are above-uncovered print bed, labeled as Touching Build Plate. This allows a decent amount of flexibility in how supports are generated. If you are unfamiliar with supports, please see the image below.
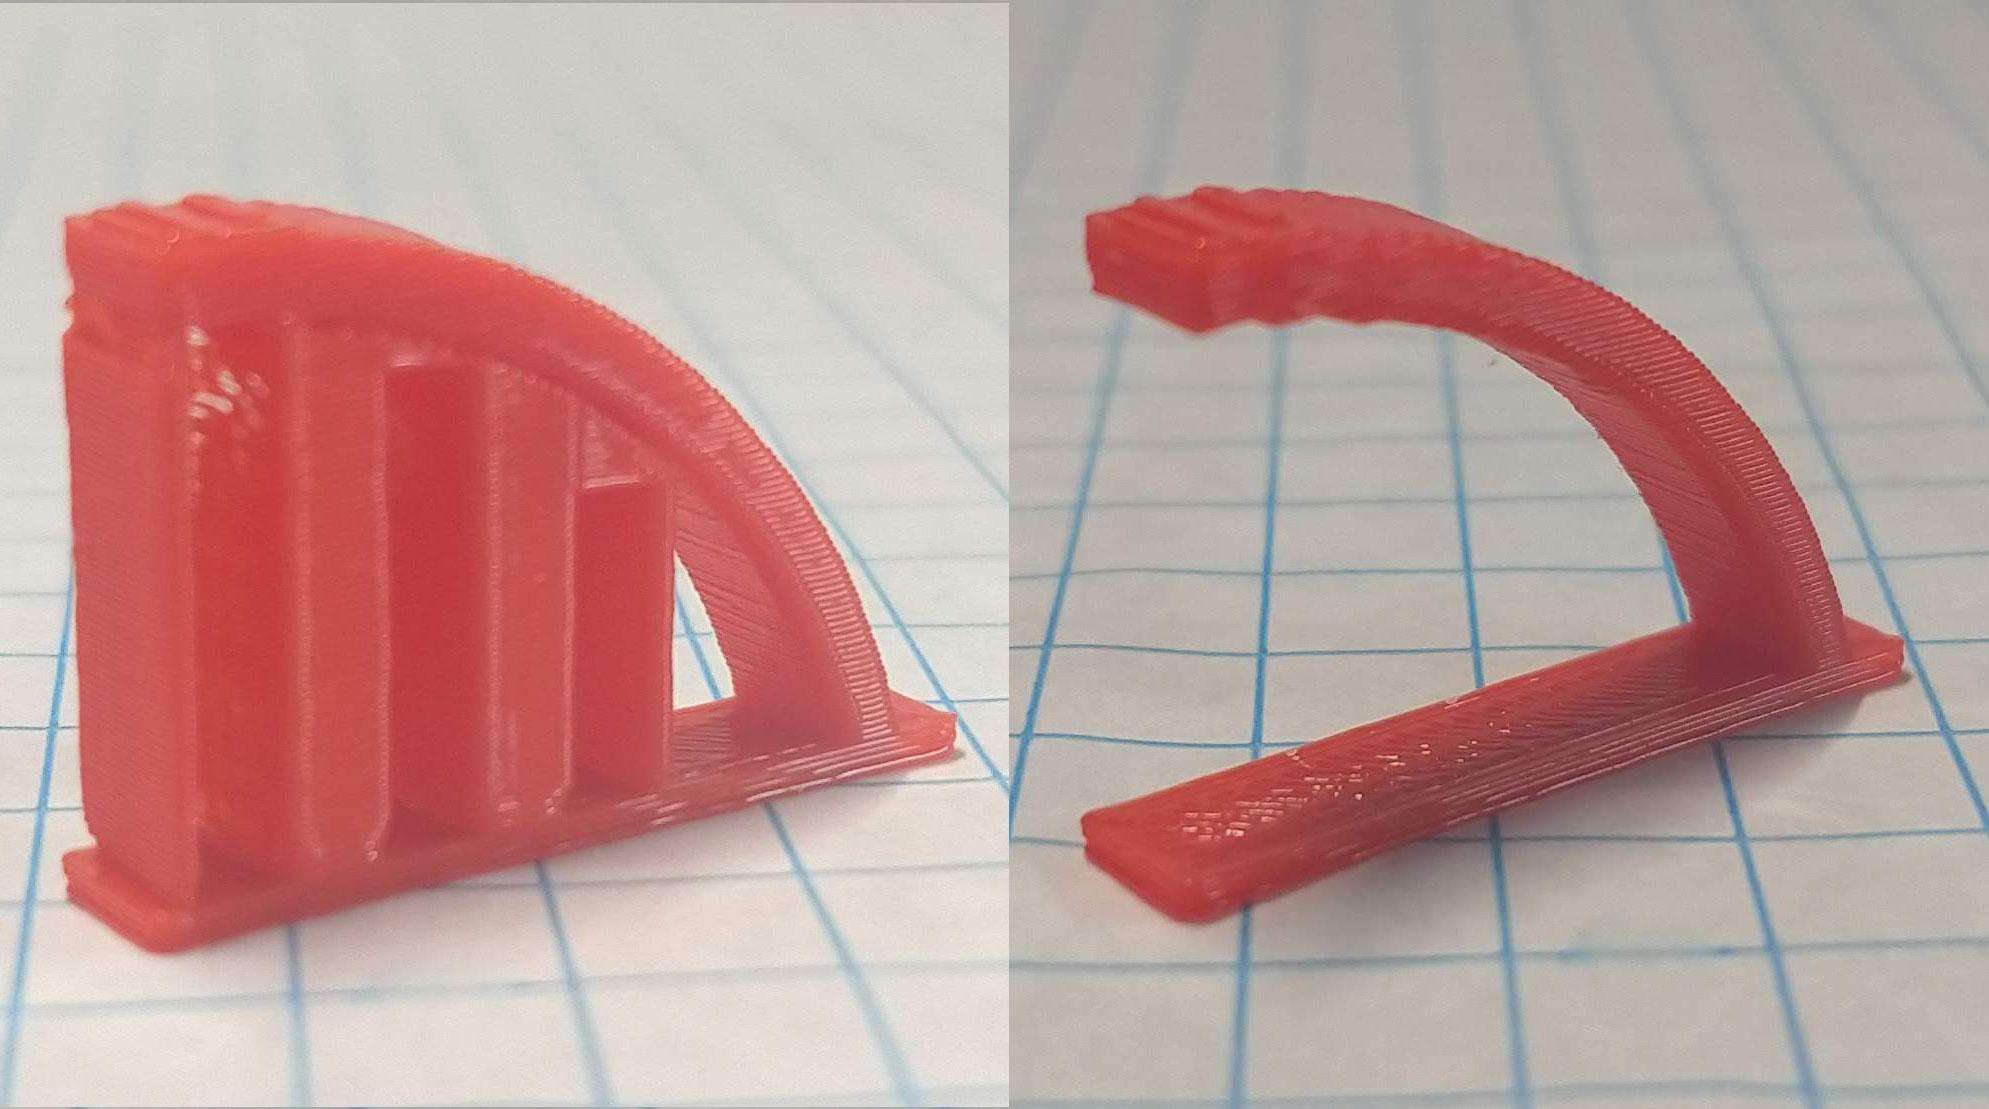
Generally, support material consists of very thin lines placed to allow the object to rest on it during printing. This prevents it from sagging if it has a significant amount of surface area that hangs freely. Supports are designed to be thin enough to be easily removed once the print has finished. In the above example, my printer would have had a lot of difficulties printing such a large overhang. With Cura’s ripple-patterned supports printed under it, it turned out pretty well.
If you use a 3D printer to create complex objects (tabletop miniatures are a good example) you will have to use supports. So far my printing needs have allowed me to get away with just using Cura’s default support options. There are many ways to customize them to fit your needs.
Build Plate Adhesion
The last setting I am using is labeled Build Plate Adhesion. This gives you the choice of a skirt, brim, or raft. Brims and rafts directly support your print by adding more layers below and/or around it. They help keep your object adhered to the print bed, and are most necessary if the print is tall or narrower at the base.

A skirt is just a single layer perimeter drawn around the object to prime the extruder. You can see a skirt around my stringing example a few sections above. A skirt is basically a quick throwaway print that ensures the filament is flowing well by the time the printer starts on the actual object. This helps with first layer bed adhesion (yep, more adhesion tips!).
Finally, below all the settings in my screenshot, Cura has done the math on my print. It has estimated print time and material cost. 22 cents to upgrade the duct on my filament cooler? Sign me up!
Final Words
I hope you have learned something from this overview. It only scratches the surface of the options Cura has available. Because it has so many features, Cura can support basically any FFF/FDM 3D printer around, from the simplest single extruder model to giant multi-extruder monsters. It’s all about setting the software up to support your use case.
A great thing about slicer settings, like the ones we just covered, is they are a safe place to experiment and try to get the best results possible. As long as you keep the basic capabilities of you printer in mind, the worst thing you can do is waste some filament. Of course, don’t change everything all at once, or you may not know what change had what effect. Getting the best quality you can out of your printer takes time and a fair amount of patience, but it’s definitely worth it.
With that, it looks like I have a print to start. While I’m off printing can you do me a favor and share this page with anyone you think might be interested? Help us get out there so we can keep improving this great 3D Printing community.
Lastly, if you have any more questions or comments please leave them below. We love hearing from you guys. After all this content is for you.